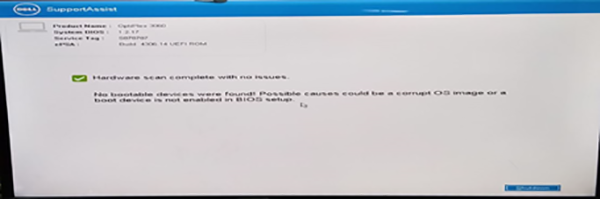
To fix a Dell computer showing the “No bootable device found” error, you need to perform a hardware hard reset. If that doesn’t help, you can try running Dell SupportAssist diagnostics or adjusting your BIOS boot sequence because if the main hard drive is not in position 1, the system won’t be able to read the storage.
This error happens because your motherboard loses communication with your storage files. This guide is important here because it lists all the step-by-step fixes for Dell computer no bootable devices issues without paying for an expensive repair shop.
Quick Answer: Perform a hard reset by turning off the PC, disconnecting all external devices, and holding the power button for 15 seconds to fix Dell computer no bootable devices error. Next, you can try Dell SupportAssist Diagnostics to check drive health. If it passes, then enter BIOS and perform Windows Startup Repair.
5 Fixes for Dell Computer No Bootable Devices Found
“No bootable devices found” error means your machine’s hardware cannot locate the essential files required to start up Windows. This can be fixed by performing a hard reset, running built-in Dell diagnostics, rearranging your BIOS startup checklist, resetting configurations to default, or, in the worst case, reinstalling Windows.
Let’s see these fixes in detail below.
Fix 1: Perform a Hard Reset and Disconnect External Devices
A hard reset is basically a way to completely reset a computer. Any leftover memory in hardware parts is erased. This drains the static power from the motherboard and makes your computer re-detect the hard drive from scratch. This automatically fixes the Dell computer no bootable device found error.
Step 1: Disconnect every single cable and device from your computer.
Step 2: Press and hold the power button on your Dell PC for a full 10 seconds. Once the lights go off and the sound stops, release the key.
Note: For laptops with removable batteries, remove the battery and hold the power button to drain the battery.
Step 3: Now, connect only the power cable or charger back to the Dell computer. Press the power button normally to turn it on and check if it boots successfully into Windows.
Fix 2: Run Dell SupportAssist Pre-Boot Hardware Diagnostics
If a simple power reset does not work, the next fix is to check whether your computer can communicate with its hardware components. Dell machines have a built-in tool called SupportAssist Pre-Boot System Assessment (ePSA) that checks the hard drive health.
It runs an automatic scan on the storage drive, motherboard, and memory without booting into Windows.
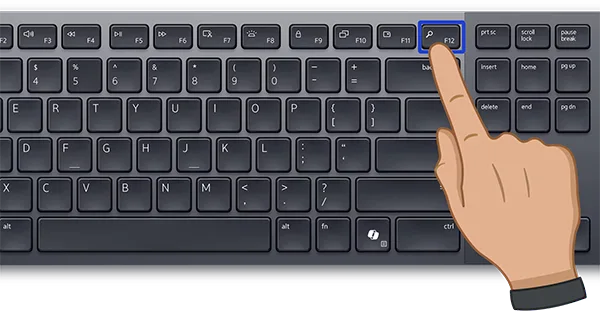
Step 1: Turn on your computer. Start tapping the F12 key repeatedly at the Dell logo screen until the boot menu loads.
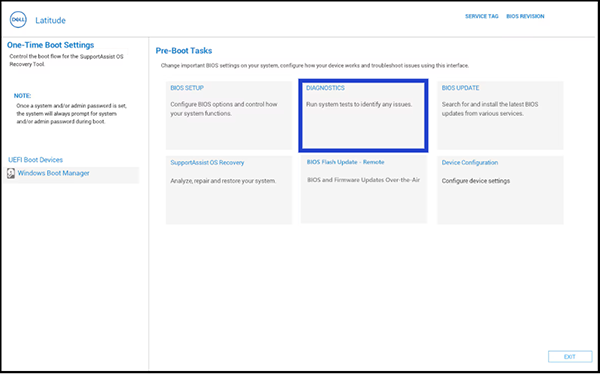
Step 2: Use the arrow keys and select Diagnostics from the menu. Press Enter.
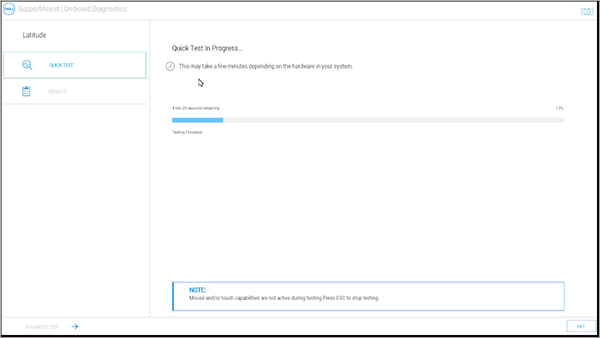
Step 3: The diagnostic quick scan begins. Note that your mouse and touch screen will become inactive during this process.
Step 4: Once the scan finishes, check the status screen. “All tests passed safely” indicates your device is physically functional.
Note: Tap F2 to enter BIOS settings or F12 for the one-time boot menu.
Fix 3: Reconfigure BIOS Boot Settings and Sequence
A computer follows a checklist to find where the Windows operating system files are stored when it turns on. So, if these are mixed up or corrupted, the computer will look at the wrong storage first. This will fail to find Windows and show a boot error. To fix this you need to rearrange this startup list.
Note: The computer can be recovered by changing the boot sequence back to UEFI only if the OS is installed with UEFI before the sequence is changed.
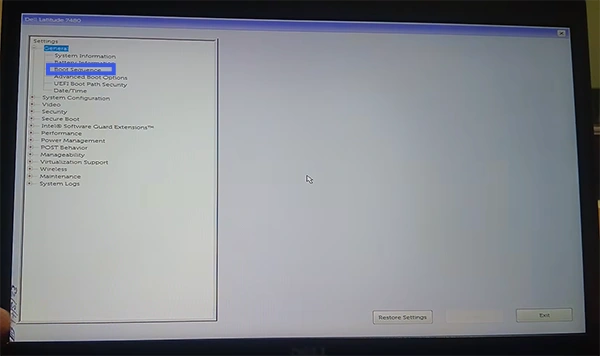
Step 1: Turn on your Dell and tap the F2 key repeatedly.
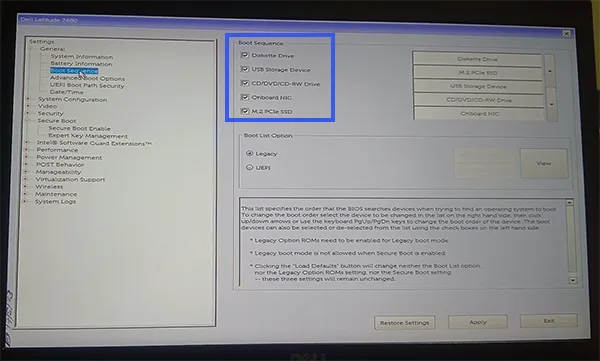
Step 2: Use the arrow keys to look across the top or side tab. Select Boot or Boot Sequence.
Step 3: Look at the sequence of devices. Select your hard drive and use the keys shown on your screen (usually + and -) to move it to Position 1.
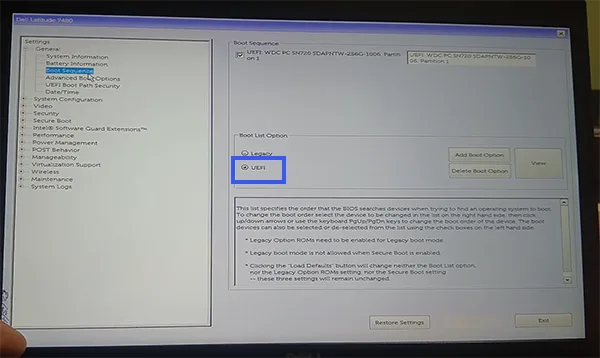
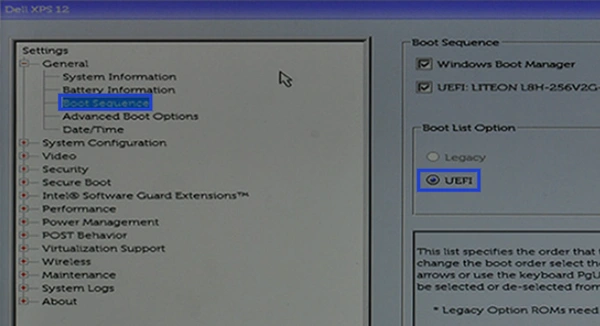
Step 4: Find the Boot Mode line and make sure it is set to UEFI.
Step 5: Click Exit, select Save Changes and Reset, choose Yes, and let the computer reboot normally.
Fix 4: Run Windows Startup Repair
Hardware is working, but the computer still cannot boot. In this situation, Windows Startup Repair might help. It is a diagnostic tool designed to automatically scan your PC’s hidden system files and repair broken system configurations. Using this, Windows repairs its own bootloader files without changing any personal documents and resolves the Dell computer no bootable devices issue.
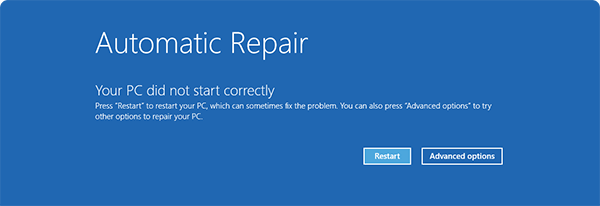
Step 1: Turn on your Dell PC and hold the power button as soon as you see the Dell logo to shut it down. Repeat this 3 times until the blue Automatic Repair screen loads.
Step 2: Select the Advanced options button.
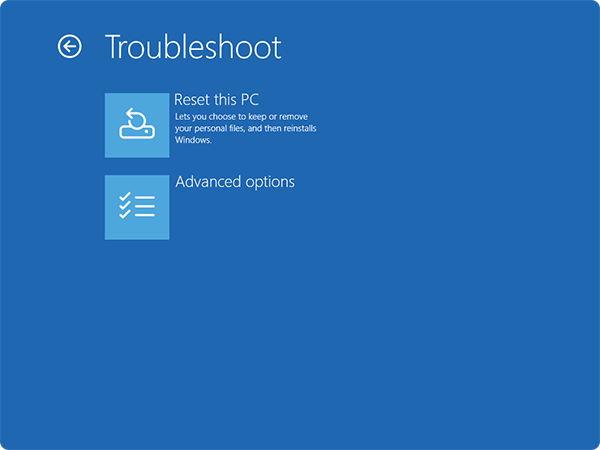
Step 3: Click on Troubleshoot from the options list.
Step 4: Select the Advanced options on the next page.
Step 5: Click on Startup Repair. This will start analysing your Windows operating system configuration.
Fix 5: Reinstall Windows OS Safely
For a legacy-mode-installed operating system, the system partition table gets locked in an outdated format. To permanently resolve the Dell computer no bootable devices conflict, you must reconfigure your motherboard back to its native UEFI environment and complete a fresh installation of Windows.
Step 1: Shut down and turn on your Dell PC. Tap F2 continuously to open the BIOS.
Step 2: Set the Boot Sequence to UEFI and click Apply.
Step 3: Go to Advanced Boot Options, uncheck Enable Legacy OptionROMs, and click Apply. This will block the old drive structure.
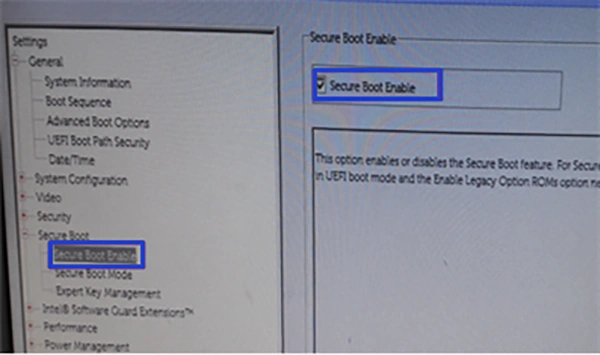
Step 4: Choose Secure Boot and check the box for Secure Boot Enable.
Step 5: Then click Apply in the lower corner of the screen.
Step 6: Click Exit and wait for the computer to reboot.
Step 7: Connect the bootable Windows USB drive to your computer and reinstall the Windows 10 operating system.
What Causes Dell Computer No Bootable Devices Found Error?
The no boot device Dell error triggers when your Dell computer’s motherboard finishes its initial power check but still cannot establish a connection with the software files needed to load Windows. Here are a few common reasons for the “no boot device found” issue:
Incorrect BIOS Boot Sequence:
The computer checklist that is seen when booted must be mixed up. That’s why it is causing it to check empty USB slots or disc drives instead of your main hard drive.
Corrupted System Boot Files:
Vital setup files (Master Boot Record (MBR) or Boot Configuration Data (BCD)) got damaged or deleted by sudden power loss or interrupted software updates.
Misconfigured Boot Modes:
The clash between the operating system and the mode restricts the motherboard from reading the storage drive partition structure.
Loose Storage Drive Cables:
The internal wires or storage slots connecting your hard drive to the computer motherboard have gone loose over time.
Mechanical Hard Drive Failures:
The internal hard drive or SSD has suffered permanent mechanical damage or physical failure and needs a replacement.
Dell Boot Error Summary
The “No bootable device found” error on your Dell computer is a very common issue that you can fix yourself.
To get your PC working again, always start with the simplest solutions. Do a quick hardware reset or use Dell’s built-in SupportAssist diagnostic tool. Other methods include rearranging your boot priority sequence and completing a clean reinstallation of Windows if your boot files are corrupted.
Using these, you can trace the cause and fix the communication breakdown between the motherboard and the storage drive.
Frequently Asked Questions
How to bypass no boot device found?
Ans. To bypass no boot device error:
Disconnect all external USB storage devices, memory cards, and printers.
Restart your computer.
Press F2 at startup to enter the BIOS menu.
Go to the Boot Sequence settings and change the option from Legacy to UEFI.
Move your internal hard drive to position 1.
How do I fix my Dell computer that won’t boot up?
Ans. To fix a Dell computer that won’t boot up, start by performing a hard reset. Use Dell’s built-in SupportAssist Diagnostics to check for hardware issues.
What is the F12 boot key in Dell?
Ans. The F12 key on a Dell computer opens the one-time Boot Menu during the initial system startup.
What is the Dell BIOS key?
Ans. The official Dell BIOS key is F2. To enter the BIOS setup utility, you must turn off your computer completely, press the power button to turn it back on, and immediately tap the F2 key repeatedly before the Dell logo appears.
Will I lose my personal data if I fix the “no bootable device” error?
Ans. No, fixing the “no bootable device” error will never erase or change your personal files. Your local files and software applications are safely stored on your physical storage sectors. Personal data can only be deleted in case of a physically dead drive or if proceeding with a clean operating system reinstallation.
What are the common Dell diagnostic error codes for hard drive failures?
Ans. Dell diagnostic error codes can be seen after a Pre-Boot System Assessment. The most common failure codes are Error Code 2000-0142 and Error Code 2000-0151, both showing that your storage system has suffered serious physical or firmware degradation.