


Not necessarily. If the drive is not recognized in Disk Manager, it could be a firmware issue or a dying component. Do not attempt to force it to connect. Try fixing the issue using Disk Management; if not, a professional can stabilise the drive firmware to extract the data.
How to Recover Data from Hitachi Drive?
Data recovery from Hitachi drive (now often HGST/Western Digital) requires a cautious approach, especially if the drive makes unusual noises. The best course of action depends on whether the damage is physical or logical.
To successfully get your files back, you have three main paths to follow: using built-in operating system recovery tools, using data recovery software, or seeking professional data recovery services. In most of the cases, when a drive is unreadable or formatted but still in working condition, data recovery software is highly effective.
In this guide, you will see the exact steps you need to follow across the three paths for data recovery.
What are Hitachi Drives and What Causes Data Loss?
Hitachi is known for producing highly reliable and durable Hard Disk Drives (HDDs) and solid-state drives (SSDs). Despite their superior performance, Hitachi hard drives are also vulnerable to breaking down. The data loss often results from physical failure, logical corruption, accidental deletion, etc., and when due to any of these reasons, the data on the hard drive gets corrupted or becomes inaccessible, it can be complex to restore data from a Hitachi drive.
What are the Reasons for Data Loss?
Though Hitachi drives claim to be powerful, due to various reasons such as overheating, physical damage, virus attacks, natural disasters, etc., these drives may lose data.
What are the common causes of Hitachi drive data loss?
- Physical Damage: Hard drives can suffer severe damage if not properly cared for. Operating the drives in a poorly ventilated space can lead to overheating, while physical shock, like dropping, may cause a head crash. Or any contact with water or fire will likely result in permanent data loss.
- Mechanical Failure: Wear out of internal moving components or damage due to internal issues. It accounts for 60% of all drive failures. The drive starts making a clicking, buzzing, or grinding sound, indicating that there is some mechanical failure.
- Logical Errors: The non-physical issues, where the drive functions mechanically but can not access data due to a software issue. The issue may be corruption of the master file table or the partition table.
- Human Errors: Improper handling and system mismanagement may cause data loss. Human mistakes include incorrectly formatting a drive or overwriting data before a recovery can take place, leading to data loss from the drive.
- Firmware Issues: Hitachi drives can suffer from firmware. Firmware governs drive operations such as head management, bad sector remapping, translation layer that maps logical data blocks to physical sectors.
- Power Surges or Outages: Sudden power interruptions can cause severe data corruption, particularly if it happens while the drive is writing data. It can interrupt the drive’s shutdown sequence, causing heads to crash on the platter.
What are the Signs of Drive Failure?
The catastrophic failure of a Hitachi hard drive often begins from a breakdown in how its moving parts and magnetic sensors interact. Think of it like a high-speed record player; if the needle fluctuates or the disk gets any tiny scratch, the music cuts out. In a Hitachi drive, even a microscopic physical issue can lead to total data loss. Understanding why these specific drives fail helps us see the warning signs early.
Here is a look at the science behind why these drives crash and what actually happens inside the drive.
- Strange noises: Unusual noises from the drive are an indicator of mechanical failure in HDDs, as they rely on moving parts. In such cases, do not continue using the drive to prevent damage to your data.
- Slow performance: If your system is taking longer to access or modify files/folders, it is an early warning of drive failure. This shows that the drive is struggling to read or write data due to damaged sectors or a mechanical issue.
- BSOD: You see Blue Screen of Deaths (BSOD) or face unexpected shutdowns, it’s due to the drive’s inability to read/write data due to bad sectors and failing hardware.
- Overheating: Another visible sign of drive failure, which can lead to permanent data loss, eventually causing mechanical disk expansion.
- Corrupted files: While corruption of files can start from system issues, frequent file errors show that the drive is developing “bad sectors” or is in a state of decline.
- Disappearing data: When bad sectors develop or the file directory structure is damaged, the OS can not locate your files. Hence, disappearing data is a critical warning that the drive may be failing. (To recover disappearing or corrupted data, use data recovery software.
- SMART errors: Self-Monitoring, Analysis, and Reporting Technology (SMART) monitors your drive to predict issues before they happen, so if you get errors, it means the drive’s diagnostics have detected an issue.
What To Avoid During Data Loss?
As you have seen the signs of Hitachi drive failure, let’s now see what one must avoid to prevent data loss from a damaged/corrupted Hitachi drive.
- Do not attempt to power on or reconnect: Continuing to use the drive may cause the failing/failed read/write head to scratch the magnetic platters, which will lead to permanent data loss.
- Do not shake, drop, or open the drive: Opening the casing outside of a Class 100 cleanroom exposes the platters to dust particles that will corrupt your data.
- Do not use the drive as a secondary drive: Until you get your diagnosis and know the problem with the drive, do not attempt to use it again, as continuing to use the drive will trigger further degradation of components.
- Do not write new data on the drive: Attempting to edit, modify, or save new data on the drive will delete the old data permanently, making it impossible to recover.
The moment a Hitachi drive shows signs of failure, the most critical factor in successful recovery is inaction. By resisting all the DIYs and quick fixes, the chances of recovery increase. Handling the drive over to specialised professionals is your best chance of ensuring that the file data remains recoverable.
How to Check and Troubleshoot the Hitachi Drive?
Successful data recovery from a failing Hitachi drive begins with a diagnostic phase to isolate the exact failure mode without any compromise to data. To recover data from the Hitachi drive, immediately stop using the drive if you hear any type of noise, these are signs of physical head failure.
Perform an initial assessment by checking the drive in Disk Management to see if it’s detectable. If detected but inaccessible, use professional data recovery software to create a byte-to-byte clone before scanning to prevent data loss.
Back up your data to any secondary storage device or cloud service to keep the data safe.
Step 1: Determining the Scenario
- Listen for sounds: If there’s any unusual sound coming from the drive in use, it’s just a read/write head failure. Stop immediately to prevent the platter scoring.
- Check detection: If the drive is not recognized in Disk Management or BIOS, it may have firmware corruption or a failed PCB.
- Logical assessment: If the drive is detected but is inaccessible, it may be due to partition or filesystem corruption.
Step 2: Troubleshooting the Drive (Windows + Mac Methods)
Basic troubleshooting involves identifying whether the issue is logical or physical. Running built-in tools is the safest step for resolving logical errors on a Hitachi drive, as they are designed to repair the drive’s filesystem without the need for third-party software. These tools, such as Windows chkdsk and macOS Disk Utility, scan for directory inconsistencies, errors, bad sectors, and more that may have corrupted the drive data.
Why start with built-in tools?
- Safety: They are integrated into the OS, reducing the risk of further corruption from incompatible third-party software.
- Accessibility: No downloads are required, and it can be run even if the computer can not fully boot into the OS via Recovery Mode.
- Efficiency: They quickly verify the administrative data of your files (names and permissions), which is often the root cause of access issues.
Fixing the Drive on Windows
Method 1: Using Chkdsk
A powerful command-line utility that can force a drive to dismount and attempt to recover readable information from bad sectors.
Chkdsk (check disk) in built-in Windows command-line utility that scans the hard drive to:
- Detect file system errors and bad sectors
- Repair the logical file system error
- Mark bad sectors to prevent data from being overwritten in them
- Checking disk health and integrity
You can run chkdsk from:
- Command Prompt
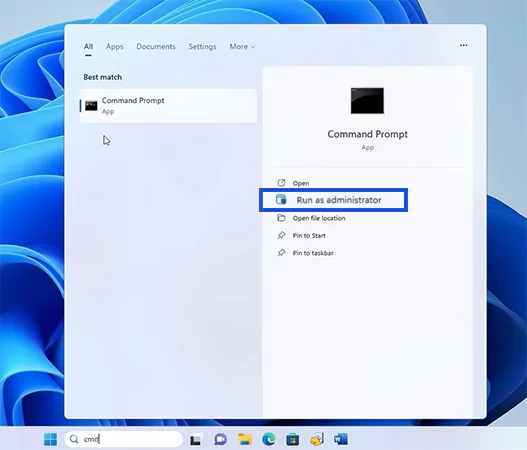
- Search for the command prompt and right-click on it to select Run as administrator.
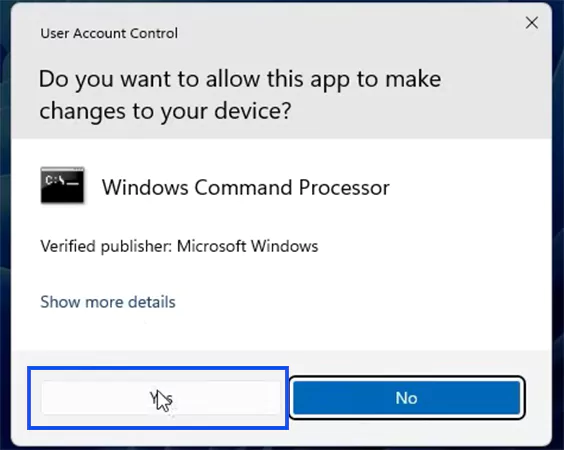
- Click Yes to confirm.
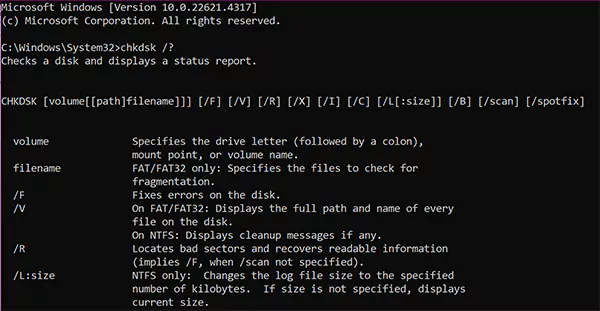
- Run command: chkdsk /?. This will list the syntax and switches.
- To fix errors and locate bad sectors, and recover readable information. Run the command: chkdsk E: /f /r /x. (Replace E with your Hitachi drive letter).

- If the drive is in use, it will be prompted to schedule the scan at the next restart. Press “Y” and Enter to continue.

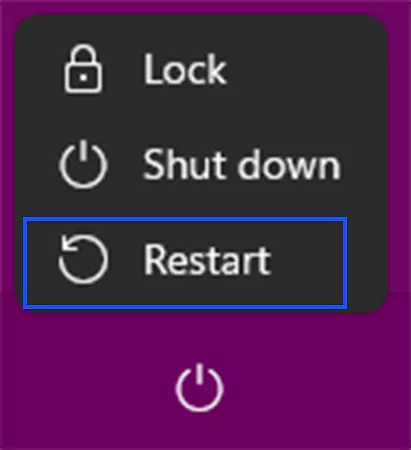
- Restart the computer.
- Search for the command prompt and right-click on it to select Run as administrator.
- Windows Recovery Environment
- Open system settings and go to Windows Update.
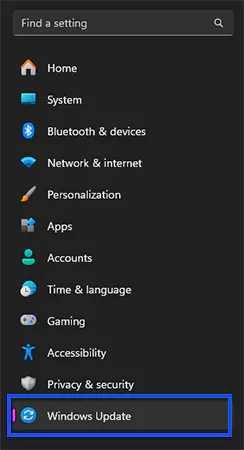
- Scroll down and select Advanced Options.
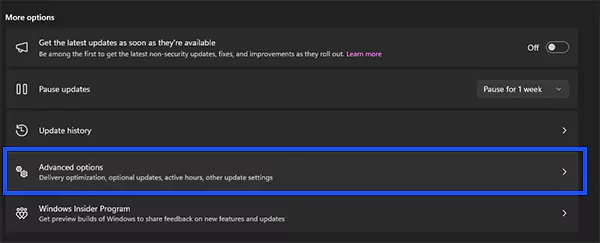
- From Additional Options, select Recovery.
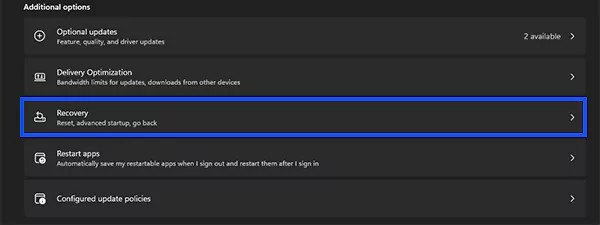
- Click the Restart Now button in the Advanced Startup.
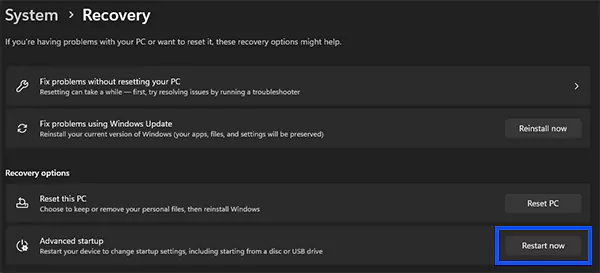
- You will be prompted to save your work before restarting. Click Restart Now to confirm.
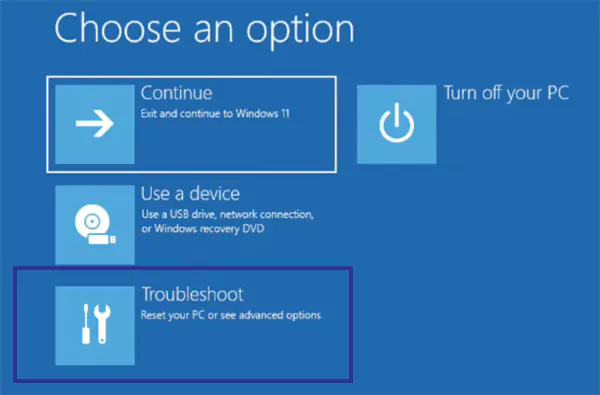
- Wait for Windows Recovery Environment to open. Click the Troubleshoot option.
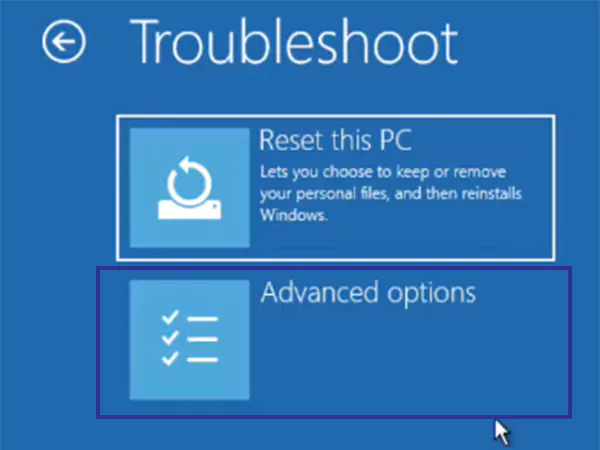
- Go to Advanced Options.
- Select Command Prompt.
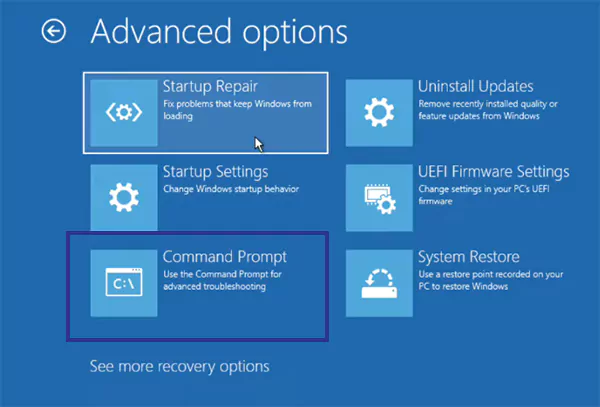
- Now run the chkdsk E: /f /r /x (Replace E with your Hitachi drive letter) command here.
- Open system settings and go to Windows Update.
- Drive Properties
- Click This PC to open File Explorer.

- Select your Hitachi drive. Right-click and select Properties.
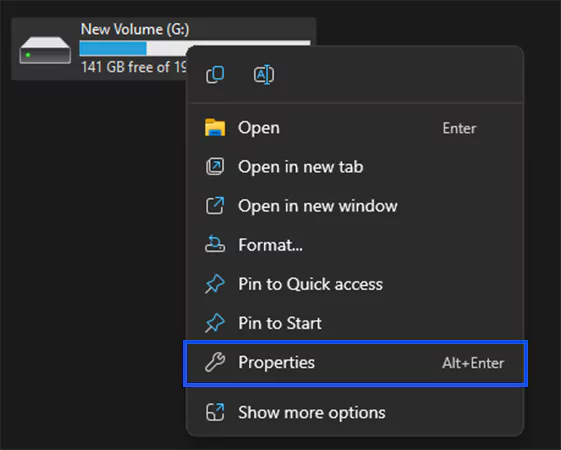
- Go to the Tools tab.

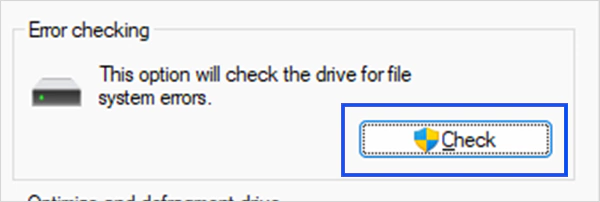
- Under Error checking, click the Check button.
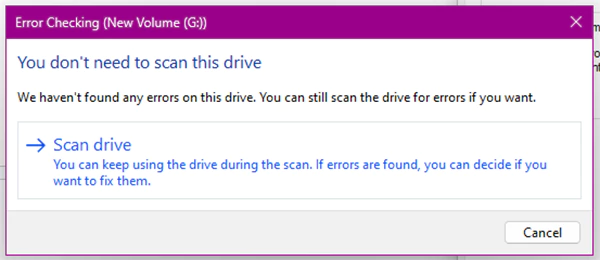
- Select the Scan drive.
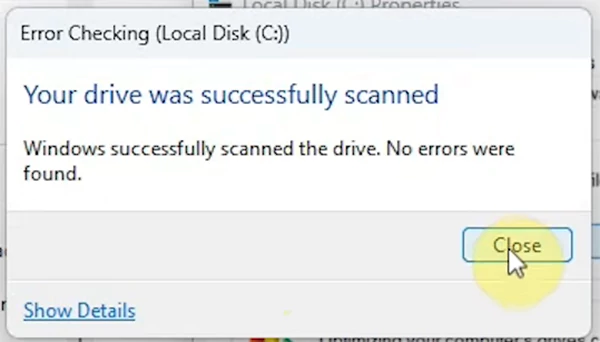
- Once the drive was successfully scanned, click the Close button.
- Click This PC to open File Explorer.
Method 2: Using Disk Management
Your hard drive powers up, but still won’t show in Windows Explorer. It is possible that the driver hasn’t been assigned a drive letter. Without it, the computer knows the drive is there but can’t access it.
Plug in your drive and you can’t find it in the Devices and Drives section
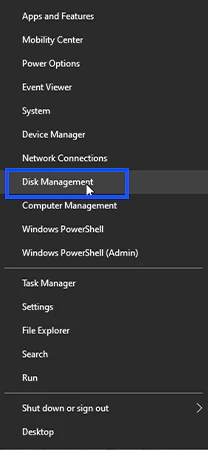
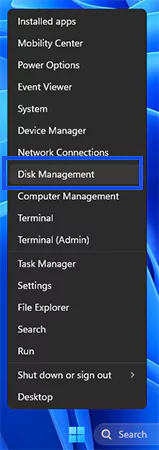
- Right-click on the Windows Start button and click on Disk Management.
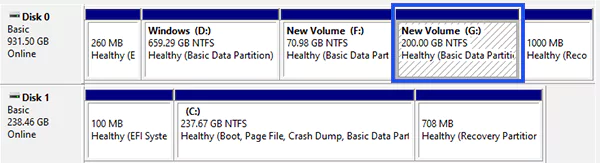
- From the list of all the drives connected to the computer, look for your Hitachi drive. It’ll probably be the one with no drive letter.
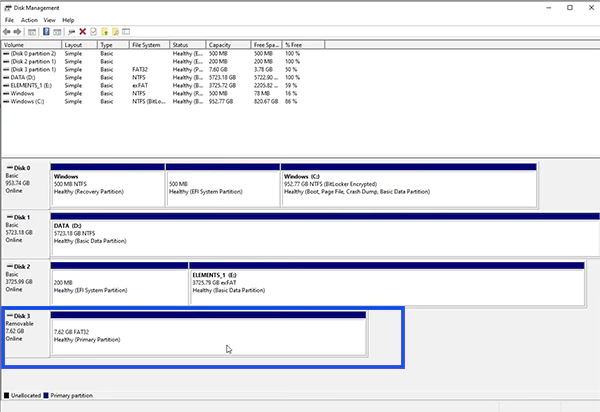
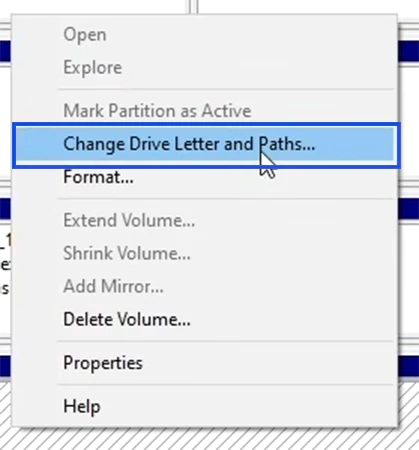
- Right-click on the drive and click Change Drive Letter and Paths….
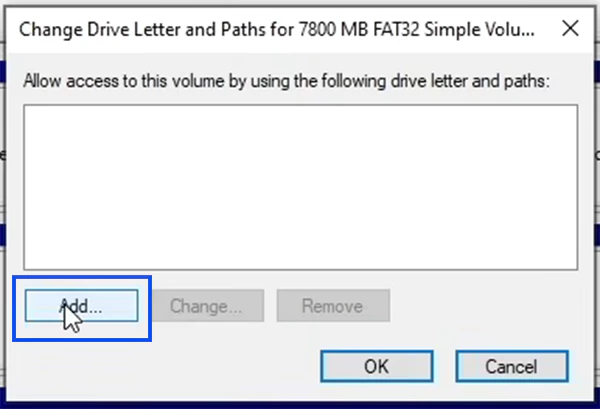
- In the next window, click the Add button.
- Make sure the circle is selected where it says “Assign the following drive letter:” and in the drop-down menu, choose a letter.
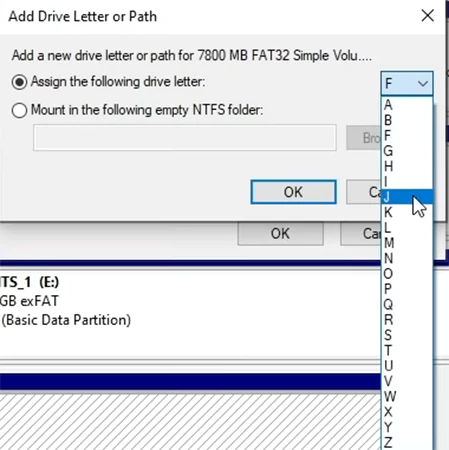
- Click OK button. The content of the drive pops up and now you can use it like a normal drive.
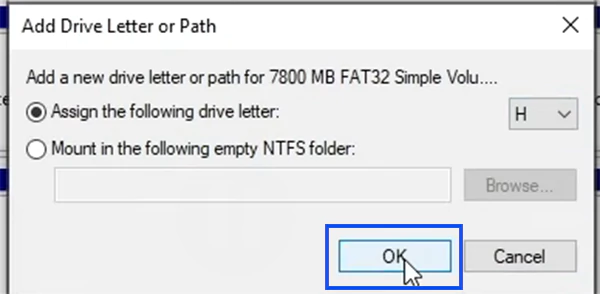
- To verify, go back to Disk Management and look for your newly named Hitachi Drive.

Fixing the Drive on Mac
Method 1: Using First Aid
Located within the Disk Utility, this tool checks the volume’s internal structure and repairs permission issues/ errors. First Aid in Disk Utility is the primary tool for repairing file system errors on Mac drives. Make sure you have a backup of your data.
- Go to Search Spotlight (🔍︎) and search Disk Utility.

- Select the hard drive connected from the left panel.
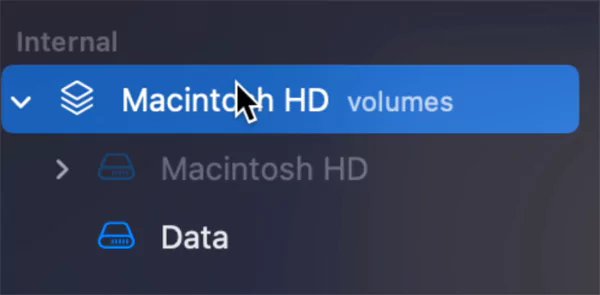
- Run First Aid(🩺) from the top bar to see if you have any errors in the disk.
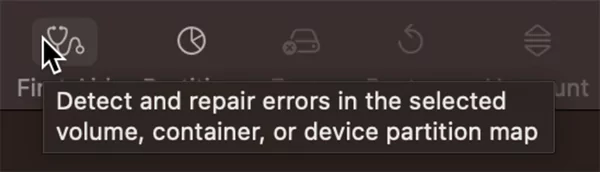
- Click Run to begin.
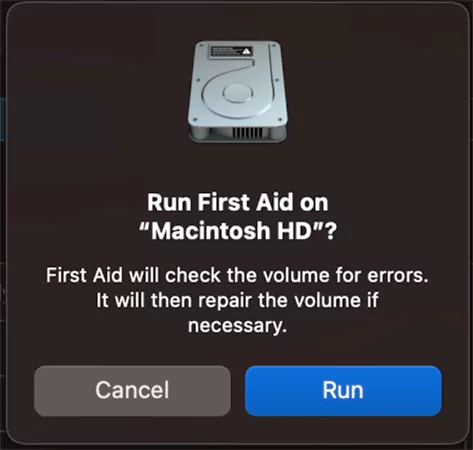
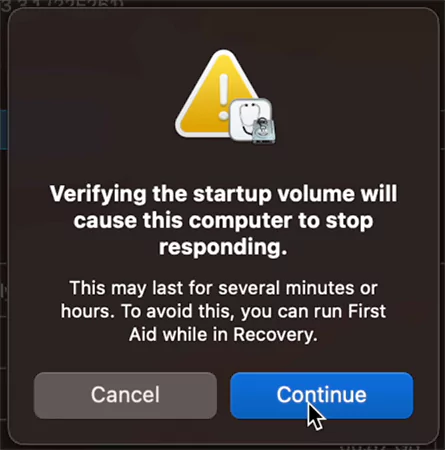
- On the warning prompt, click Continue.
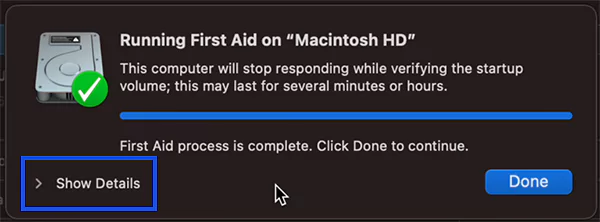
- This will run First Aid on your drive. You can click on Show Details to see if everything looks OK.
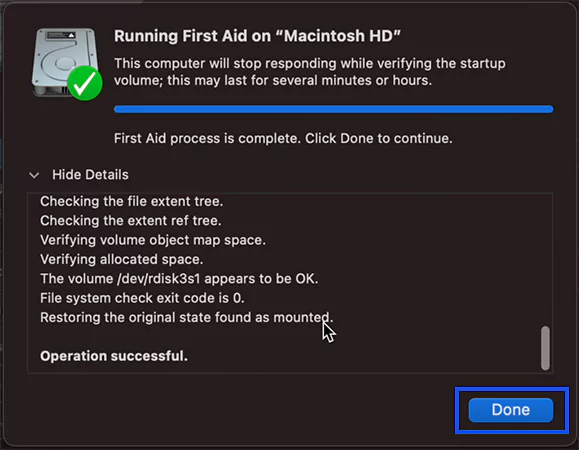
- Click on Done to finish the process.
Note: If your Hitachi drive is failing on a Mac, you can still use a Windows PC for the rescue mission. By connecting the drive externally, you can use Windows-based tools to scan the macOS file system.
What are DIY Recovery Solutions (for Logical Data Loss)?
DIY data recovery for Hitachi drives includes using built-in utilities, such as Windows File Recovery or macOS First Aid. These are designed to identify and fix internal drive errors that prevent your files from showing up.
Method 1: Using Windows File Recovery
Windows File Recovery is a free, command-line utility for Microsoft, designed to recover deleted files from local storage devices, including Hitachi internal and external hard drives. It is compatible with Windows 10 and 11. It uses multiple recovery modes to scan your drive and restore data.
How to use Windows File Recovery?
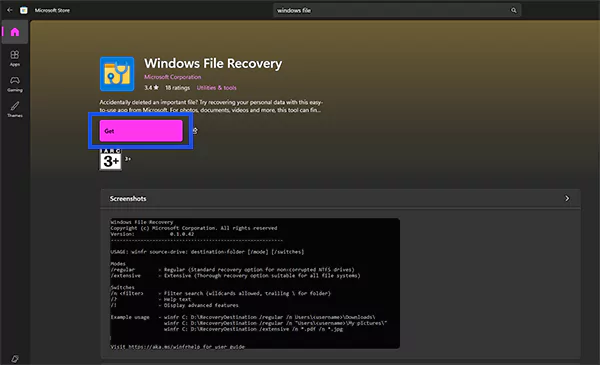
- Search for Windows File Recovery in the Microsoft Store and click Get.
- Note the drive letter of your Hitachi disk (e.g., E: ) and a separate destination drive (e.g., F: ).
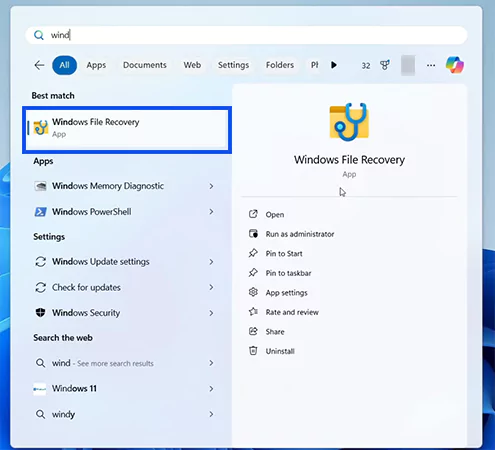
- Search for and open the Windows File Recovery app.
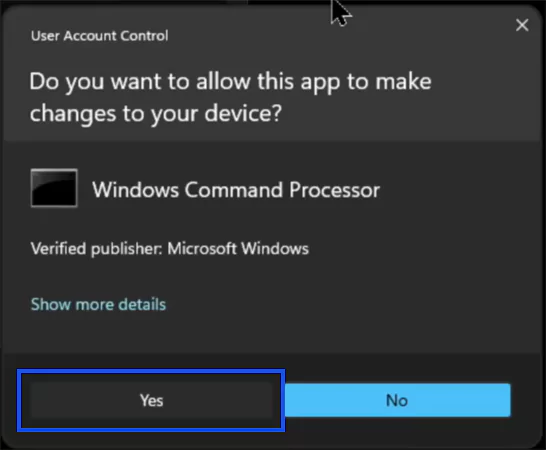
- When you are prompted to allow the app to make changes to your drive, click Yes.
- Enter the command in the following format:
winfr source-drive: destination-drive: [/mode] [/switches]

- Choose the mode:
- /regular: Recover your recently deleted files.
Winfr C: E: /regular /n \Users\<username>\Documents\
- /extensive: Recover files from corrupted or formatted drives.
Winfr E: C: /extensive /n *invoice*
- /regular: Recover your recently deleted files.
- When prompted to confirm, enter “Y” to start the recovery operation.
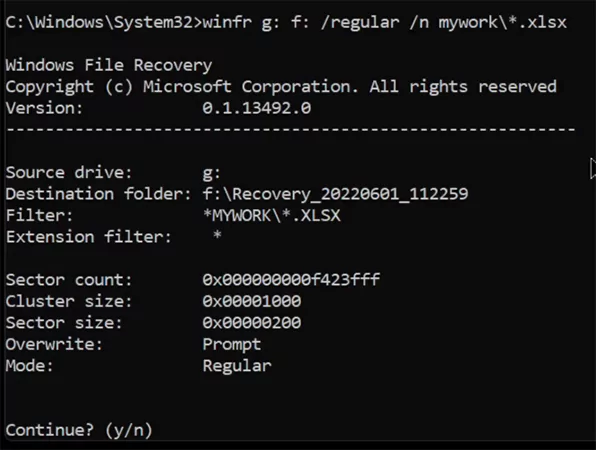
- The tool will automatically create a recovery folder on your destination drive.

- To stop the recovery process in between, press Ctrl + C.
This was how to use a powerful free first-part tool to recover data from Hitachi drive. Its command-line interface can be difficult for you if you are not tech-savvy. If you prefer a visual experience, third-party data recovery software would offer more intuitive features. But before we get to that, here is another CLI tool for drive data recovery.
Method 2: Using TestDisk Command-Line Tool
TestDisk is another powerful open source, CLI tool to recover lost, corrupted, and non-booting drives caused by software errors, corrupted partition tables, or human error. It functions independently of the manufacturer’s specific hardware architecture, just focusing on the drive’s logical structure.
Features of TestDisk:
- Free and open source
- Command-line interface
- No file review
- Supports various file systems
Let’s understand how to use TestDisk:
TestDisk on Windows:
- Download TestDisk from the CGSecurity download page suitable for your operating system.
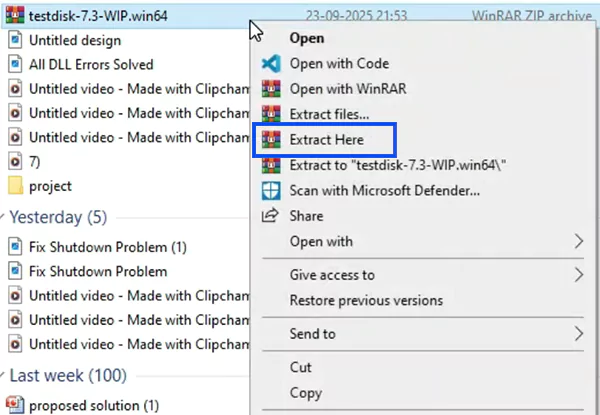
- Go to the download folder, find the downloaded file. Right-click on it and select Extract here. This will start the extraction.
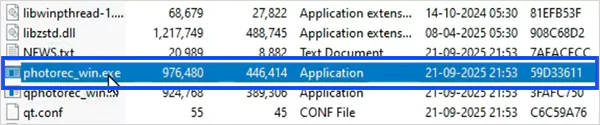
- Now open the extracted folder, and look for the photorec_win.exe file. Double-click on it to run.
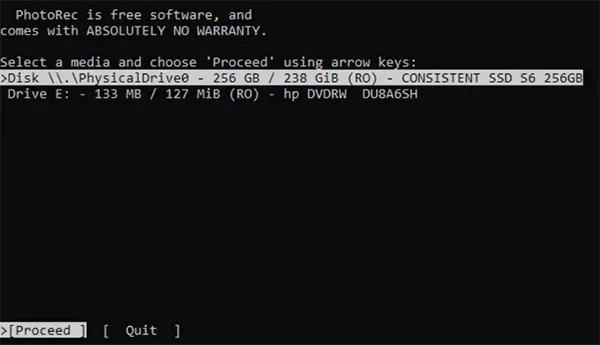
- A command prompt-style window will open on your screen. Press Enter to continue.
- From the list of drives connected to your computer, select your Hitachi drive and press Enter.
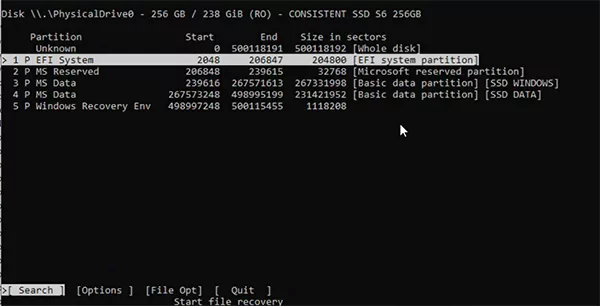
- Next, select the partition type. Just press Enter to continue.
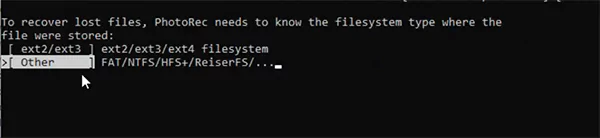
- Select the Filesystem Type from the list and press Enter.
- Select the space that needs to be analysed. Select whole and press Enter.

- You will be required to select the place where you want the recovered files to be saved. Navigate using arrow keys, select a folder, and press Enter.
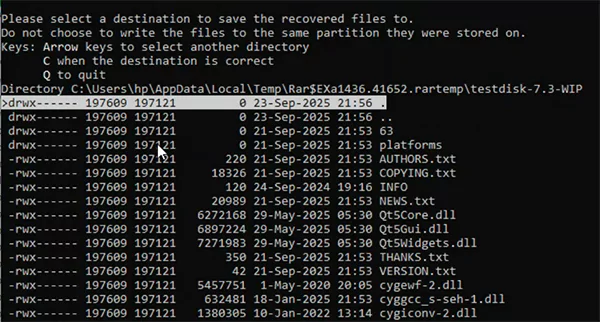
- TestDisk will begin the recovery process.
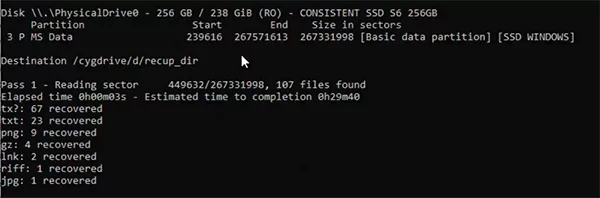
After the process is complete. You’ve successfully recovered data from your corrupted Hitachi drive using testdisk.
TestDisk on Mac:
Connect your Hitachi drive and make sure it is mounted and accessible on your Mac.
- Download the MacOS version from the CGSecurity website for your Mac.
- Extract the downloaded Zip folder.
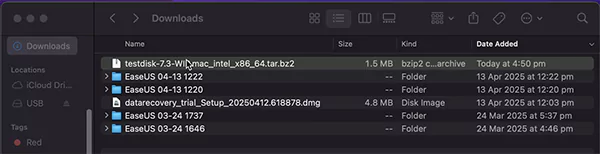
- Search and open the Terminal using Search Spotlight.
- In the terminal type sudo drag the photorec file from the downloaded folder to the terminal and hit Return.

- You will be prompted to enter your admin password. Enter the password and press Return.
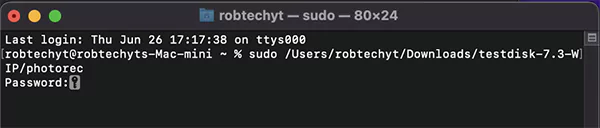
- Use the arrow keys to select your Hitachi drive and press Return.
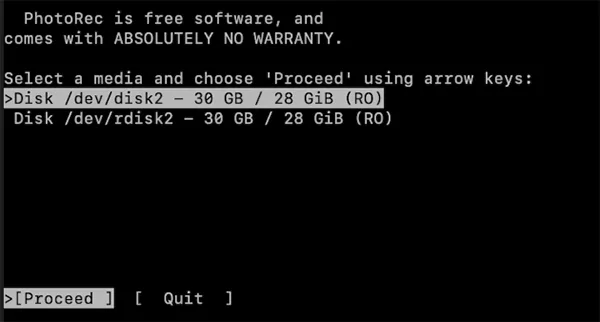
- Select the partition files where your lost files were located.
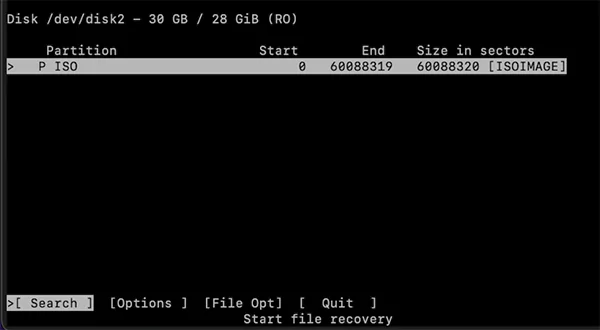
- For most external drives, choose Other from the options of filesystem type.

- Finally, select the destination folder to save the restored files.
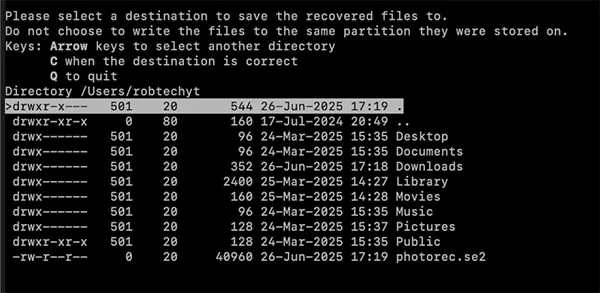
- You will be prompted to allow access. Click OK to continue.

- Press C to begin the recovery. The scan will begin, and recovered files will start getting added to your selected folder.
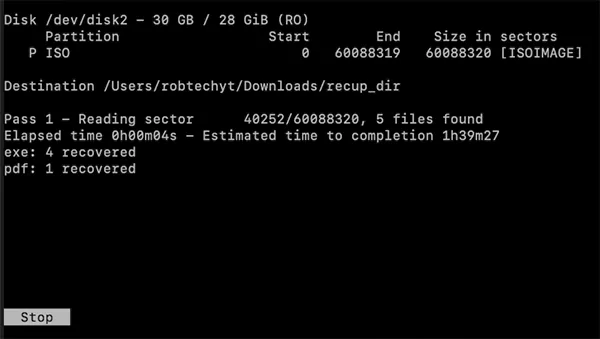
Check the destination folder on your Mac for recovered data from your Hitachi drive.
When to Use Data Recovery Software?
Data recovery software should only be used when a Hitachi drive is physically healthy and identified correctly by the operating system, but the data is inaccessible due to logical errors. In this case, the data is physically present on the platter until new information overwrites those sectors.
Using data recovery software is appropriate if the drive:
- Shows no physical symptoms: There is no unusual sound such as clicking, grinding, or whirring.
- Is correctly recognized: The BIOS/disk management tool displayed the drive with its accurate storage capacity.
- Suffered logical failure: Data loss resulted from the virus attack, software crash, file system corruption, etc., rather than some hardware damage.
How to Format the Hitachi Drive?
If all your data recovery attempts fail and the drive is still corrupted, or if the drive has become unstable, formatting your Hitachi drive serves as the final measure to restore functionality. Make sure to keep a backup or whatever data is accessible, as formatting the drive will make it new and no data will be there to recover.
Follow these steps to format Hitachi drive based on your operating system.
For Windows Users
The most reliable way to format an internal or external Hitachi drive is through the Disk Management tool.
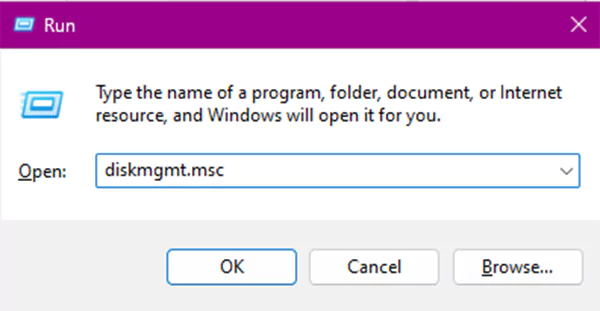
- Right-click on the Start button and select Disk Management or press Win + R, type “diskmgmt.msc” and hit Enter.
- Select your Hitachi drive. (it is usually identified by its size or a label like “Disk 1” or “Removable.”
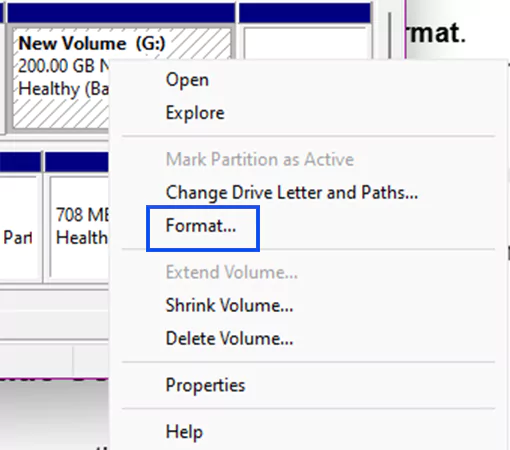
- Right-click on the drive and select Format.
- Enter a name for your drive (e.g., “Hitachi_storage”).
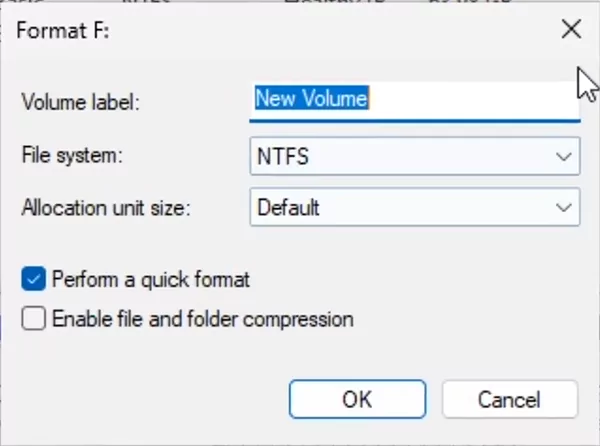
- Choose NTFS for Windows only use or exFAT if you need it to work on both Windows and Mac.
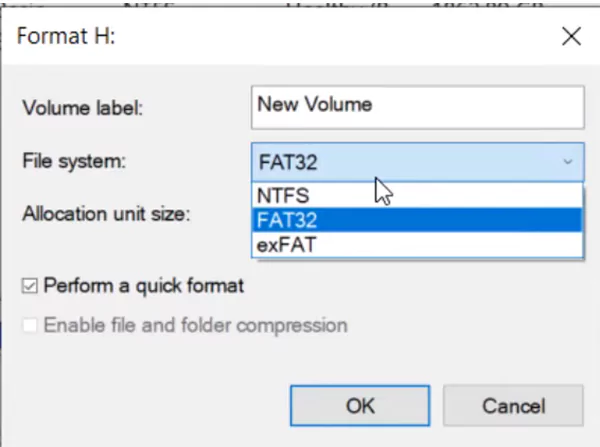
- Ensure “Perform a quick format” is checked. Uncheck it if you want to check for bad sectors.

- Click OK and then OK again on the warning prompt to begin the process.

For Mac Users
Mac users can use the built-in Disk Utility application to format the Hitachi drive.
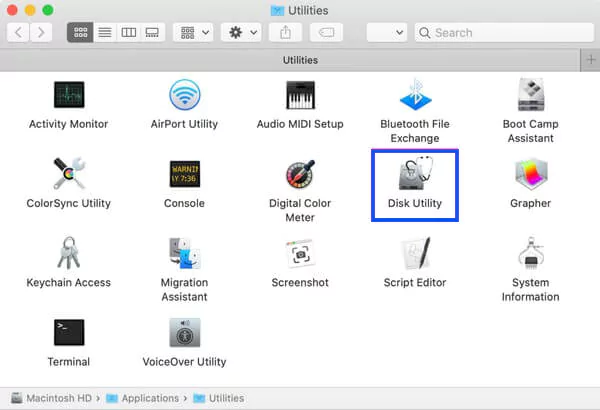
- Go to Applications > Utilities > Disk Utility, or search using Spotlight (Cmd + Space).
- Click on View in the top left corner and select Show All Devices to see the physical Hitachi hard drive.
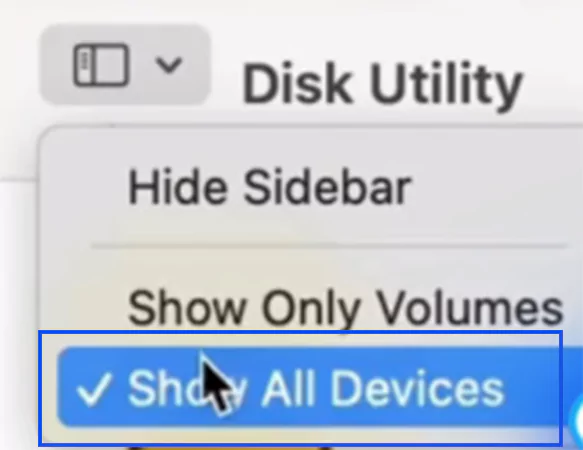
- Select the top-level Hitachi drive from the sidebar.
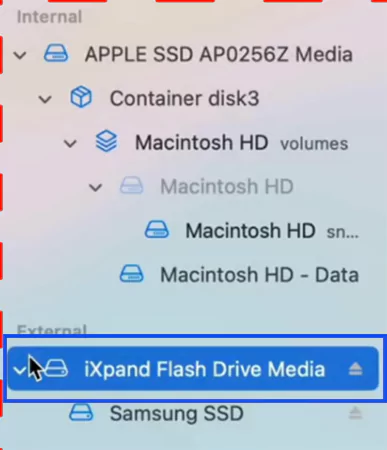
- Click the Erase button at the top of the Window.

- Configure the settings:
- Give your drive a Name.
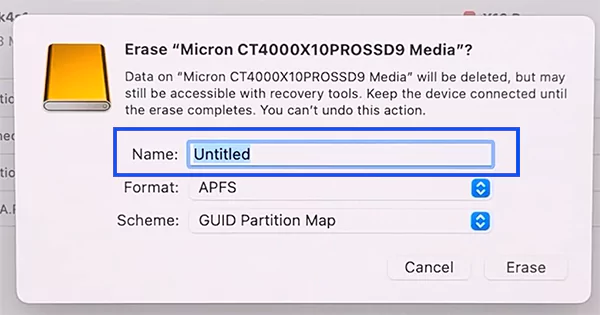
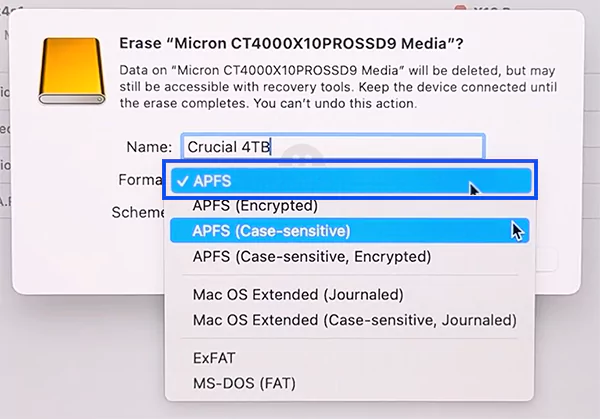
- Choose the format APS for modern Macs ( macOS 10.13+) or Mac OS Extended (Journaled) for older versions, or ExFAT for both Windows and Mac access.
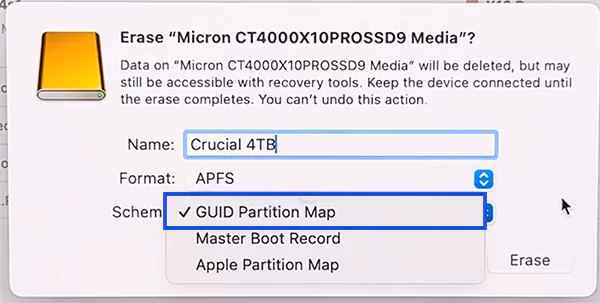
- Select GUID Partition Map.
- Give your drive a Name.
- Click the Erase button.

- Once the format is complete, the “Operation Successful” prompt appears; click Done.
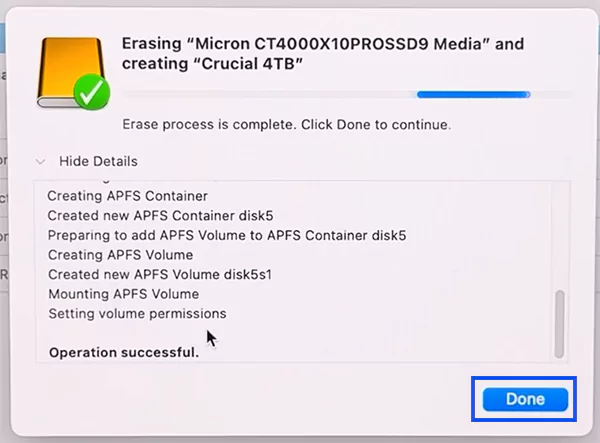
Warning: Inbuilt repair tools are only for logical issues. If your Hitachi drive is making physical noises, running these scans can exacerbate mechanical damage by forcing heads to attempt to read damaged sectors.
When to Choose Professional Hitachi Hard Drive Recovery Service?
If your Hitachi drive starts making an unusual sound, you have a physical hardware failure, which will require Class 100 cleanroom intervention. All electronic hard drives are manufactured in dust-controlled cleanrooms. It is a highly filtered, controlled environment for opening and assembling HDDs to prevent data loss. Professional recovery involves mechanical component replacement (heads, motors, etc). Therefore, contacting a data recovery service, if the drive has physical damage, is the right thing to do to get a high probability of data retrieval.
When to Contact a Data Recovery Service?
Though Hitachi is widely known as the most reliable manufacturer in the world. They use helium-sealed enclosures to reduce friction and Fluid Dynamic Bearing for smoother spinning. However, despite this rock-solid engineering, physical failure is still a risk. Professional intervention is required if:
- Unusual noise from the hard disk: These sounds usually mean the read/write heads are failing, or the motor is stuck. A specialist must replace these in the cleanroom.
- Inaccessible data: When you are unable to find a file because it has just disappeared, consulting professionals will help to retrieve those files before they are overwritten by new data. You can try data recovery software before going for professional help.
- Formatted drives: Stop using the drive immediately in case of accidental format. Also, if the drive is formatted twice, the risk of overwriting data increases.
- Overheating or water damage: Liquid causes instant electrical shorts and extreme heat can warp delicate internal parts. So, do not attempt to dry out or power on a damaged drive, as this may lead to permanent data loss.
- Mechanical damage: Physical trauma from dropping or any hit can misalign the internal delicate parts of the drive. This requires professional recovery in the specialised clean room to safely assemble the drives.
- Failed DIY or software attempts: If you used any unreliable recovery software and your drive isn’t recovered, the problem might have increased. Continuing to run DIY tools in such cases can put excessive stress on your drive and can make the data unrecoverable.
How to Prevent Future Data Loss?
Hard drives’ delicate mechanisms need stray attention and care to keep your data safe, be it Hitachi, Yaskawa, Allen-Bradley, Siemens, or Danfoss. To keep it safe, it is important to implement a multi-layered strategy that addresses both logical and physical vulnerabilities. This section covers proven and official guidelines to prevent drive data loss and maintain its integrity.
Ways to Prevent Data Loss
To protect your Hitachi drive against corruption and catastrophic failure, maintenance is needed. While recovery software serves as a safety net, preventing data loss requires monitoring drive health and optimizing usage.
Implementing these measures helps your storage remain stable, minimizing the reliance on emergency restoration tools.
- Handle your Hitachi drive with care and preferably use protective cases or shock-resistant covers. Store the drive in a cool, dry and well-ventilated place to prevent overheating.
- Keep your drive and firmware up to date, scan regularly and repair file system errors using built-in tools.
- Use reliable antivirus software to prevent malware-related issues.
- Using UPS to safeguard against power fluctuations is needed. Also, practice ejecting hard drives safely before disconnecting them from the power source.
- Keep the Hitachi hard drive on a stable surface to minimize vibrations and avoid moving it while in use.
- Regularly back up important data to a secondary storage device or cloud service. Consider using Hitachi drive data recovery software in case of accidental permanent deletion.
Final Verdict
Data loss on a Hitachi drive can be a stressful experience, but success depends on identifying the root cause early. When logical errors can be managed with software, physical damage demands expert service. By prioritizing safety through diagnostics and maintaining consistent backup, you can safeguard your digital life against future failures.
Frequently Asked Questions (FAQs)
Is my data lost if the drive isn’t recognized?
What steps to take if the drive is working but acting strangely?
- Stop writing new data: Avoid saving new files to the drive.
- Create a clone/backup: If possible, use software that creates a byte-to-byte image of the drive to scan.
- Consult a professional: If you can not see your files, contact a specialised recovery service.
How to fix a physically damaged Hitachi drive at home?
No. Physical repairs such as head swaps or platter imperfections must be performed in a specialised dust-free clean room. Opening the drive outside of this environment will cause contamination and destroy the data.
What error messages indicate my Hitachi drive is failing?
If your drive has physical or firmware damage, you might see errors like “Primary Master Hard Disk Fail,” “No Operating System Found,” “USB Device Malfunctioned,” “SMART status: Bad,” etc.
Why is my external Hitachi drive not showing up?
This can be caused by driver issues, faulty USB ports, bad sectors, power supply problems, etc. You can try checking for a drive in Disk Management or trying a different USB cable. But if it still doesn’t appear, it may have a firmware or hardware failure.
How much does professional Hitachi data recovery cost?
Hitachi data recovery costs vary significantly based on the severity of the issue. It ranges from $300 to $2,500+.
Related Blogs
You Might Also Like
8 min read
Hard Drive Repair: How to Diagnose, Fix, and Recover Data From a Failing Drive Hard drive repair is the process of fixing a broken (logically or physically) storage drive to get your files back.…
Data Recovery
August 13, 2026
8 min read
How to Recover Files After Shift+Delete? Data Recovery Hacks We were browsing Reddit recently and noticed that the forums are packed with people asking queries like: “Need advice on…
Data Recovery
August 11, 2026
8 min read
How to Recover Deleted JPG/JPEG Files? You are here because you’ve likely deleted the important images. Whether you accidentally hit “delete” or your SD card got…
Data Recovery
August 11, 2026

8 min read
What is Data Recovery Agent (DRA)? Windows EFS & BitLocker Recovery Guide Data Recovery Agent (DRA) is a designated Windows user account authorized to decrypt data encrypted by other users or the…
Data Recovery
August 7, 2026
8 min read
What Is DIY Data Recovery and How Does It Work? Your file is accidentally deleted, or let’s assume there was some software issue and you cannot get your files back.…
Data Recovery
August 5, 2026
8 min read
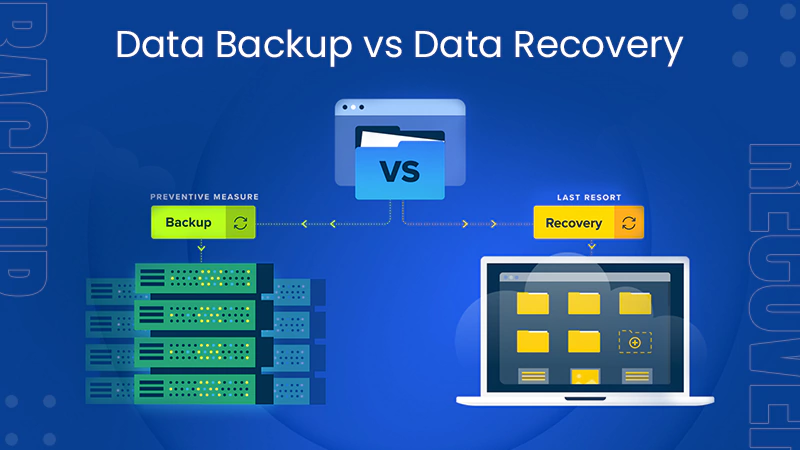
Data Backup vs Data Recovery: What’s the Difference and Why Does It Matter? Assuming that your data is secure just because you clicked “backup” is not right. Many organizations learn too late that…
Guides
August 5, 2026