


Ans. Yes, hard drives can be repaired. But it depends on the damage. If it is a software glitch (logical error), you can fix it yourself using free computer programs. If it is a broken physical part (mechanical failure), it cannot be DIY fixed, but a professional lab can repair it to get your data back.
Hard Drive Repair: How to Diagnose, Fix, and Recover Data From a Failing Drive
Hard drive repair is the process of fixing a broken (logically or physically) storage drive to get your files back. If your computer cannot read or access your drive, it is because your drive might be failing or there might just be some software glitches. Instead of paying for expensive specialist services, you can repair it yourself using simple software commands for minor glitches.
Here we will see how to do external hard drive repair; we’ll diagnose, fix, and recover the data from the hard drive safely step-by-step.
What is the Process of Hard Drive Repair? A Step-by-Step Breakdown
For successful hard drive repair, there’s a three-step approach one must follow: first, diagnose the root cause of drive failure or misbehaviour, second, fix the logical errors, and third, restore your data using backups or data recovery software. But remember, trying to fix a hard drive without a plan can accidentally overwrite your files and lead to permanent data loss.
Step 1: Diagnose Failure Before Hard Drive Repair
Before you try to fix anything, you must figure out what’s wrong with your hard drive. Hard drive failure falls into two simple categories: logical (software glitches) or physical (broken parts).
The great news from Backblaze Drive Stats is that modern hard drives are becoming more reliable than ever, with drive failure rates as low as 1.24%.
Logical vs Physical Failure
A logical failure means the drive’s physical components work perfectly, but the software or the file system inside the drive has become corrupted or broken.
Error messages you will see on your screen:
- “You need to format the disk in drive X: before you can use it.”
- “The disk you inserted was not readable by this computer.”
- “Location is not available. Access is denied.”
- “The file or directory is corrupted and unreadable.”
Symptoms of Logical Failure:
Beyond error messages, a drive suffering from a software-based logical failure will show signs like:
- Moving a small file takes hours or gets stuck at 99% indefinitely.
- Data you saved yesterday completely disappears without anyone deleting it. (Here you can use data recovery software)
- Your system crashes only when you try to open a specific folder on that drive.
- File name changes into unreadable characters or symbols.
- Disk Management shows the drive capacity is there but lists it as unallocated “RAW” space.
A physical failure means the actual mechanical parts inside the drive are broken or physically damaged.
Symptoms of physical failure:
- The hard disk vibrates when in use.
- The hard disk is not recognized by the computer.
- You hear clicking or grinding sounds when the drive tries to start.
Step 2: Fix Logical and File System Errors
For external hard drive repair, you have several powerful tools which can be used in different scenarios for hard drive repair. Since each of these solutions has specific use cases depending upon the error your drive is showing, choosing the wrong method can corrupt the drive permanently and lead to data loss.
We will see each method in detail below, explaining when to use them and how to repair hard drive using them.
Method 1: Using Command-Line Repair
Use this official method only when your computer can see your drive, but cannot open your files. It is the perfect fix to repair hard drive if you see “corrupted file” error messages, if a folder opens slowly, or if the computer asks to format the drive.
Warning: Stop immediately and do not use any of these methods if your drive is making clicking noises.
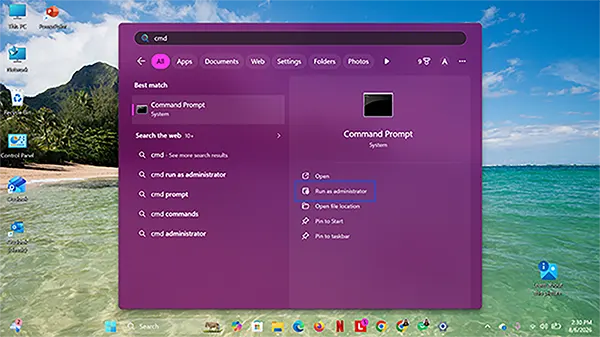
- Click the Windows Start button, type cmd into the search bar, select Command Prompt, and click on Run as Administrator.
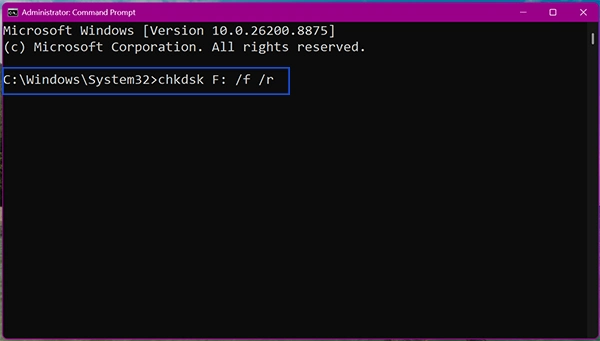
- Type chkdsk X: /f /r into the terminal (make sure to change the letter X to your actual drive letter) and press Enter.
- The /f part tells the computer to fix errors.
- The /r part tells it to find bad spots on the drive and rescue any readable data.
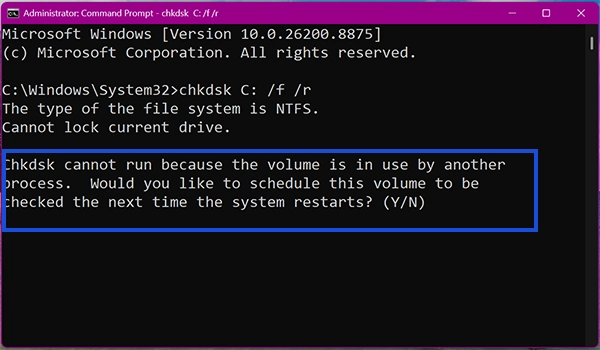
- If a message says the drive is busy, type the letter Y and press Enter. This tells your computer to run the fix the next time you turn it on.
- To see if your computer is automatically monitoring and fixing errors on the drive, type fsutil repair query X: and press Enter.
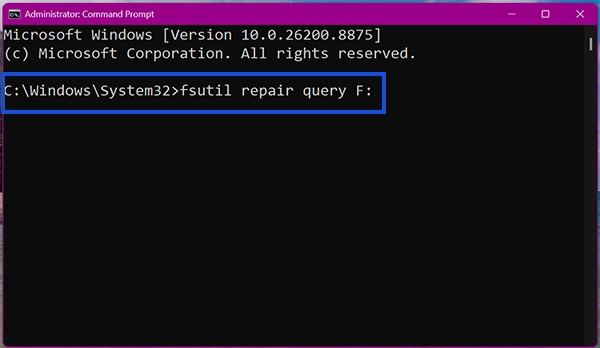
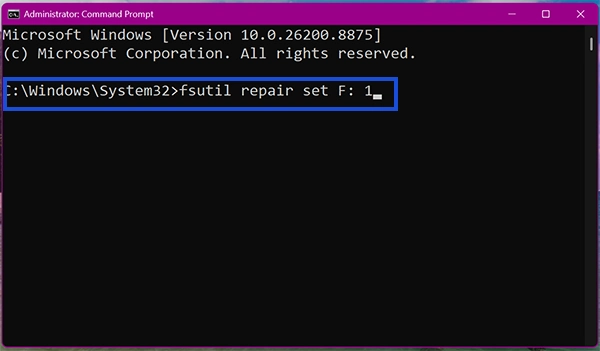
- If the screen says it is disabled, type fsutil repair set X: 1 and press Enter to fix drive bugs automatically.
Method 2: Using TestDisk
TestDisk is a powerful free open source tool designed to fix broken partition tables and bring back missing drives without deleting your data. So, you can use this when your hard drive looks empty, or your entire partition vanishes.
- Go to the official TestDisk website and download the TestDisk.zip folder.
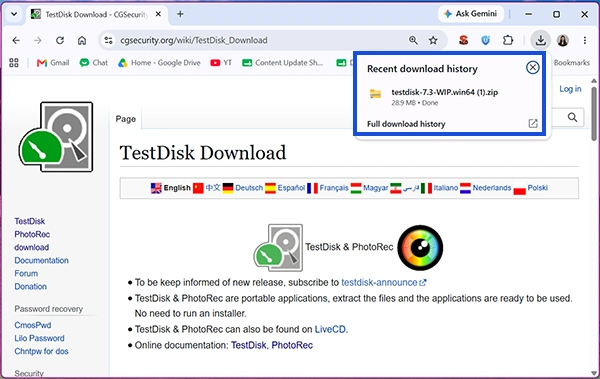
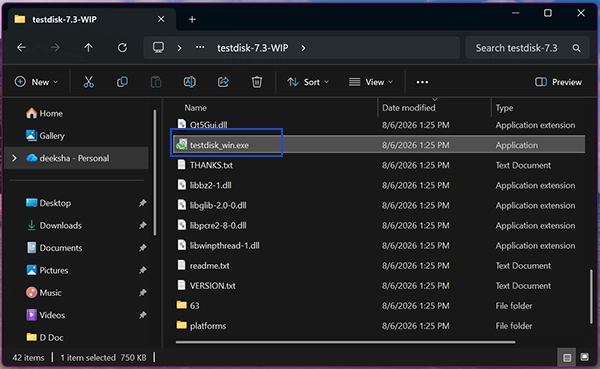
- Extract it and double-click testdisk_win.exe to open it.
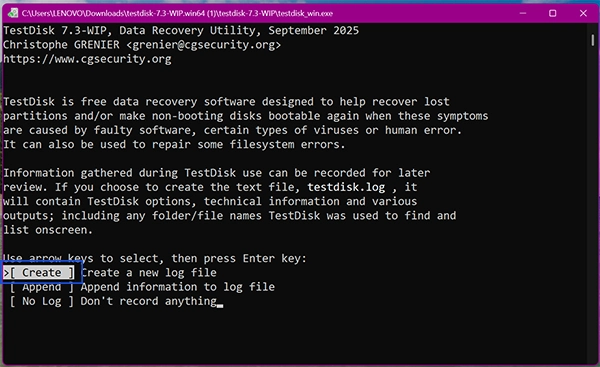
- Use your keyboard arrow keys to select Create on the first screen and press Enter to start a new session log.
- Look at the list, highlight the hard drive to be fixed, select Proceed, and press Enter.
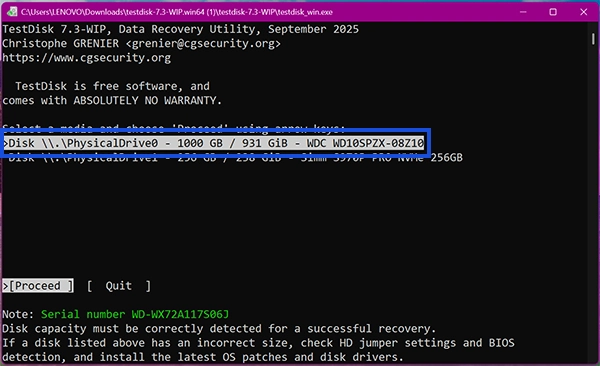
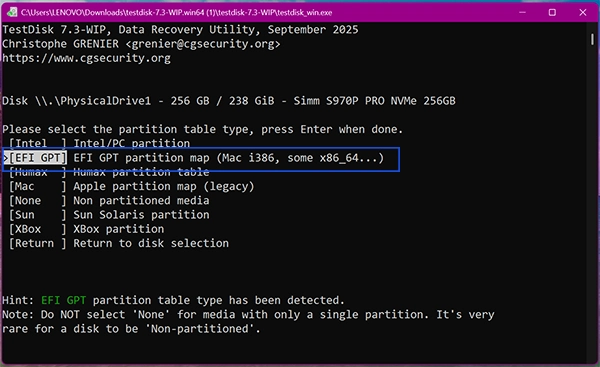
- The software will automatically guess your partition table type. Press Enter to accept the choice.
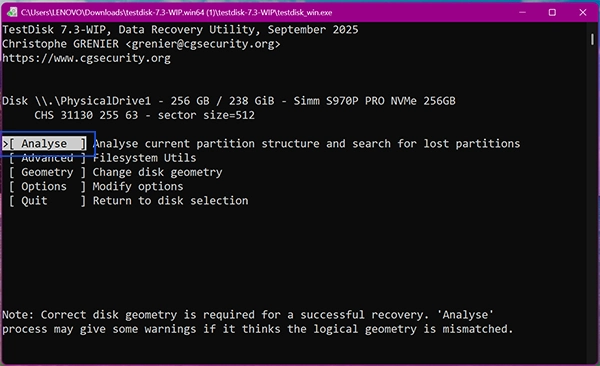
- Select Analyse and press Enter to check your current drive map.
- Choose Quick Search to look for the lost partitions.
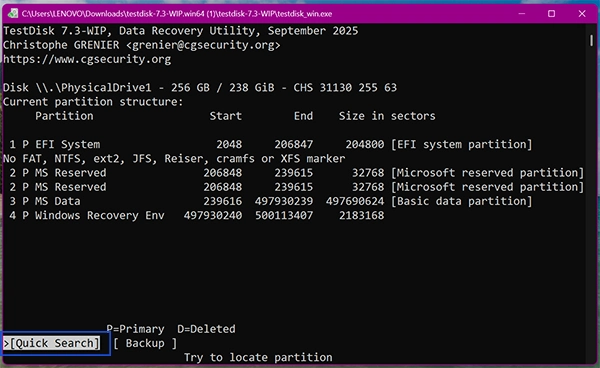
- Once the search finds your lost partitions, press P on your keyboard to look inside and make sure your files are there. Press Q to exit the preview.
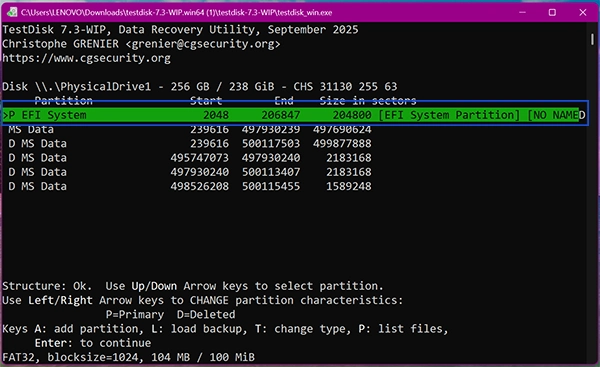
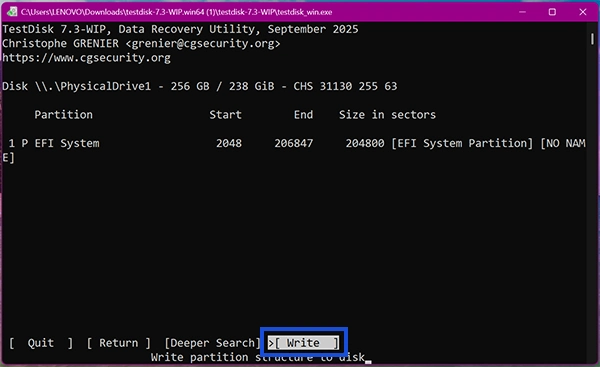
- If your files look correct, press Enter, then select Write and press Enter.
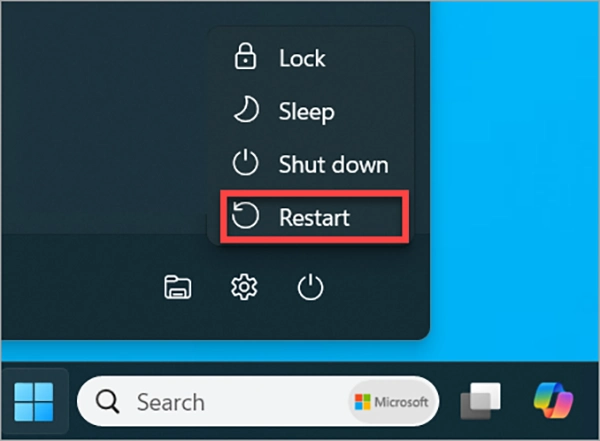
- Close the terminal and restart your PC.
Method 3: Updating Driver
A driver in Windows is a small translator program that helps your computer to talk to your hard drive. If this becomes outdated or corrupted after a system update, your drive will stop working.
To repair an external hard drive, you need to update the driver from Device Manager.
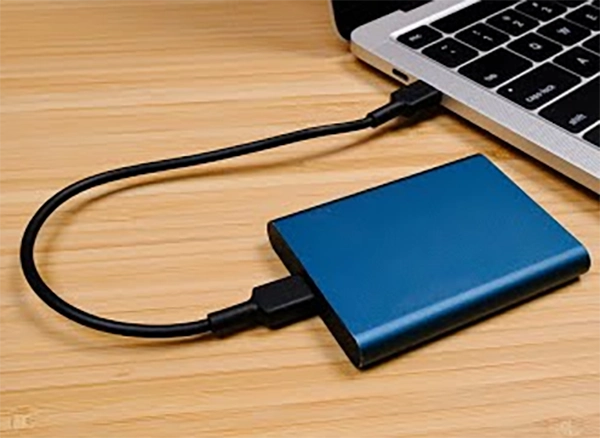
- Connect your external hard drive (if any) to your computer.
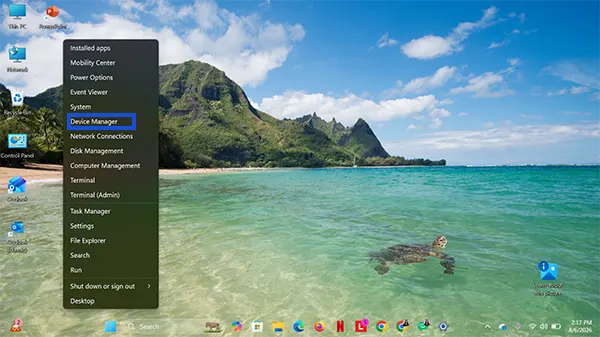
- Right-click on the Windows Start button and select Device Manager from the menu that pops up.
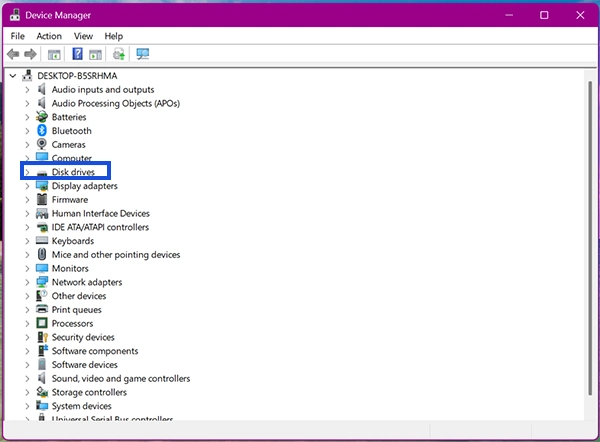
- Click the small arrow next to Disk drives to expand the list, then look for the name of your malfunctioning hard drive.
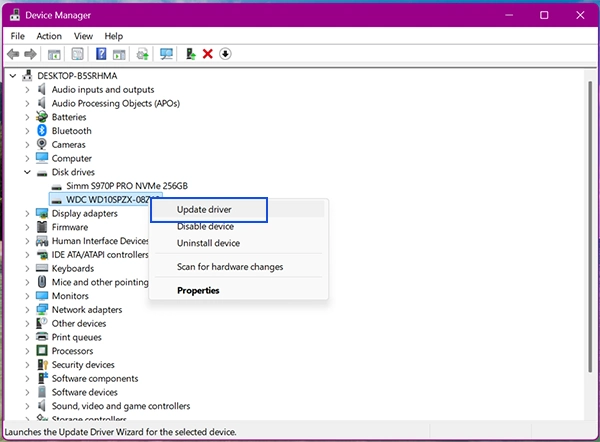
- Right-click on your hard drive’s name and choose Update driver from the list of options.
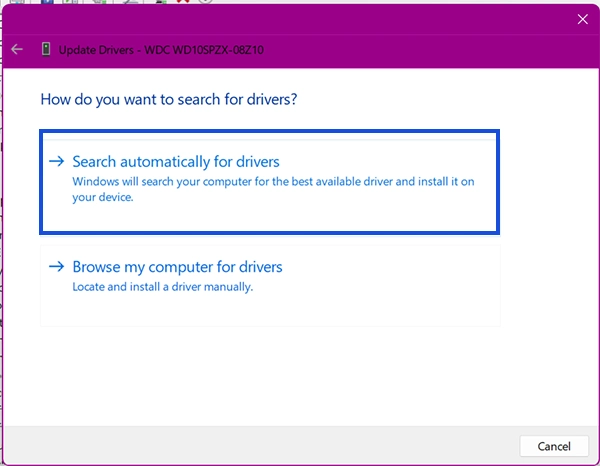
- Click on Search automatically for drivers. Windows will scan your computer and the internet to find the newest software for your drive.
Method 4: Using the Built-In Error Checking Tool
Use this method if you prefer clicking buttons with your mouse rather than typing code. It is a friendly visual wrapper for the CHKDSK command. Meaning it safely scans the drive and fixes errors.
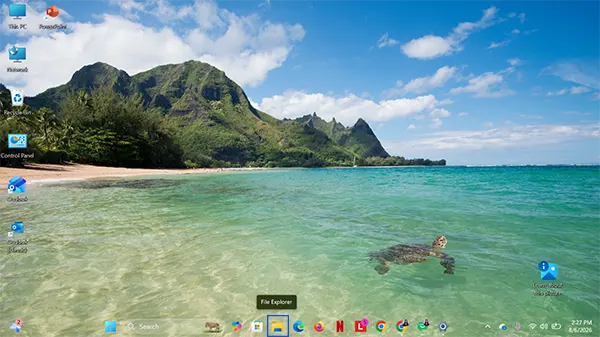
- Open File Explorer by clicking the folder icon on your taskbar or pressing Windows Key + E.
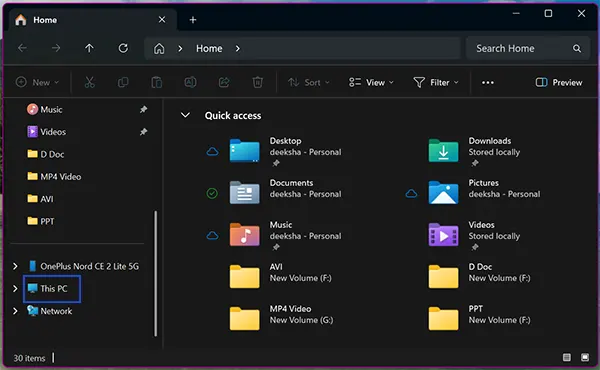
- Click on This PC from the left-hand sidebar menu to view all the internal and external hard drives connected to your system.
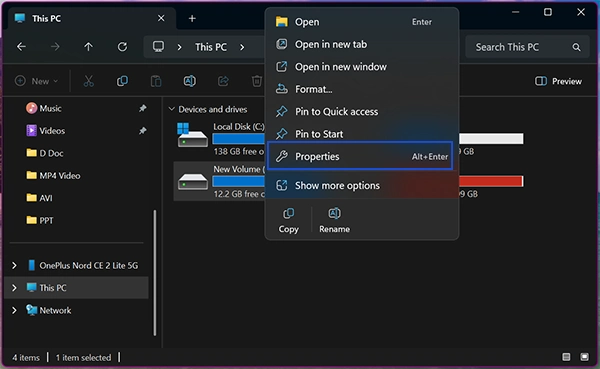
- Right-click the drive to be repaired and select Properties from the bottom.
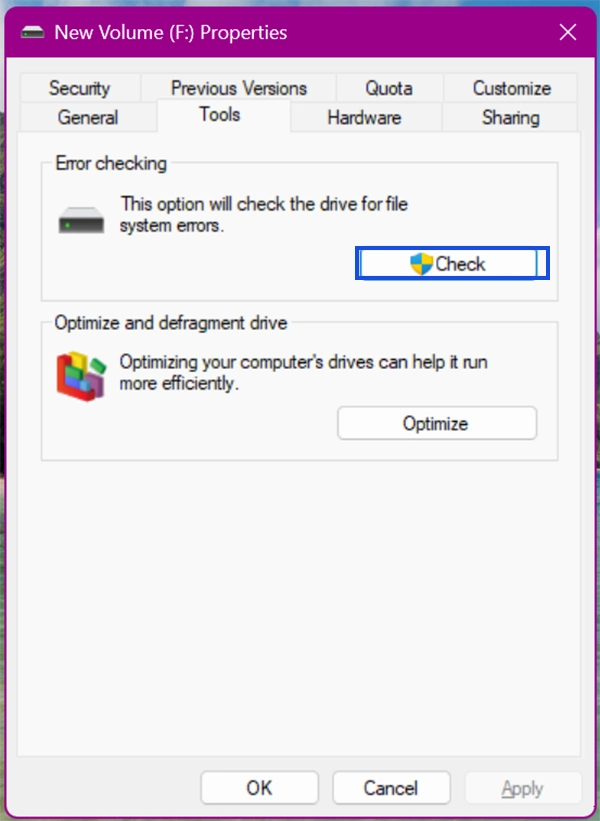
- In the pop-up window, click on the Tools tab.
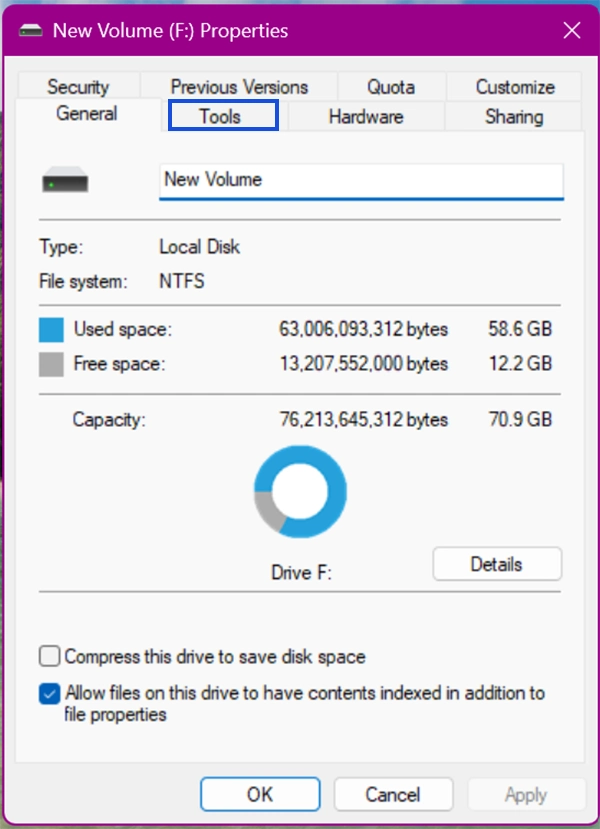
- Inside the box labeled Error checking, click on the Check button (you may need to click an administrator shield icon to allow it).
- Even if Windows says “You don’t need to scan this drive,” click on Scan drive to force a deep verification scan and wait for the scan to finish.
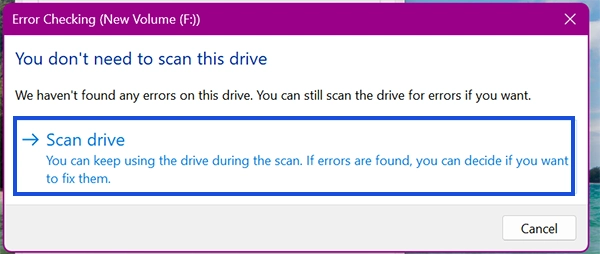
Note: If the tool finds errors, click Repair drive on the final screen and then restart your computer.
Method 5: First Aid (Mac)
For Mac users, they have a built-in software suite called Disk Utility, which features a repair button called First Aid. This tool repairs broken data pathways and internal errors, thus fixing the hard drive so your Mac can safely talk to the drive again.
Follow these steps to run First Aid on your Mac:
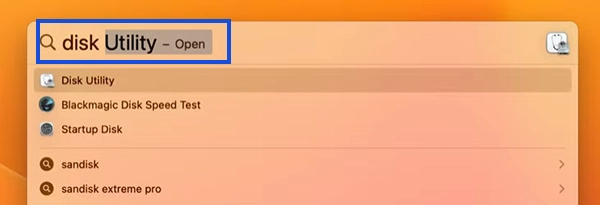
- Press Command + Spacebar on your keyboard to open Spotlight, type Disk Utility, and press Return.
- Once the window opens, click the View button in the upper left corner and choose Show All Devices so you can see your physical drives.
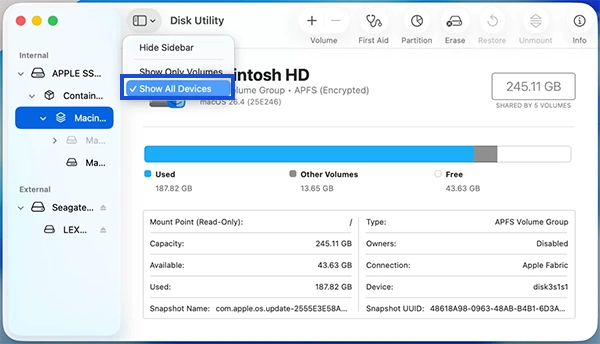
- Find the hard drive in the left-hand sidebar menu and click on it once to highlight it.
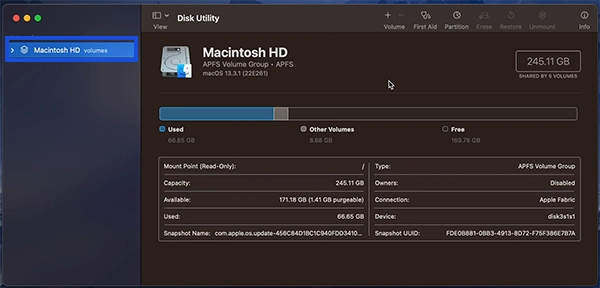
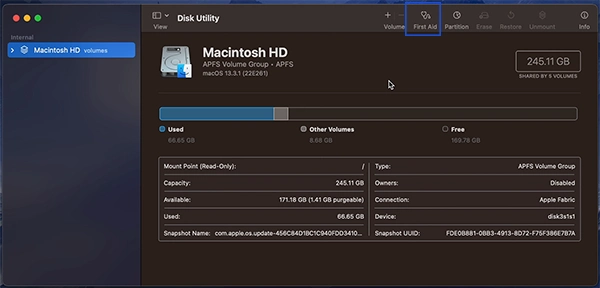
- Click the First Aid icon (it looks like a stethoscope) located in the action menu at the very top of the window.
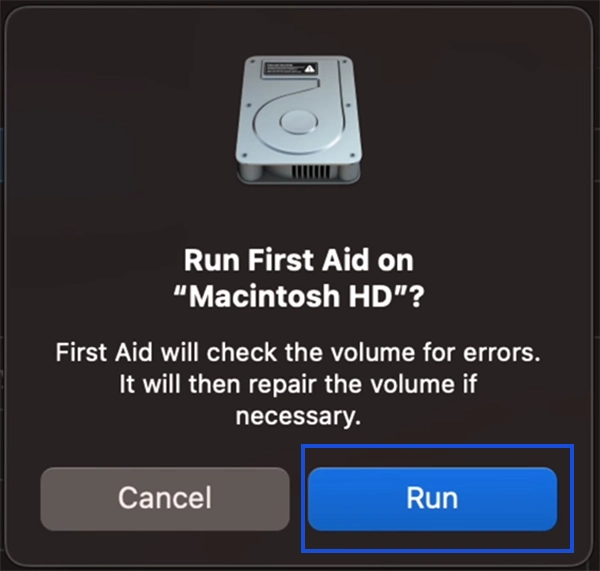
- A pop-up will appear asking you if you want to run First Aid. Click the Run button to begin the scan.
- Let the progress bar finish, click Done, and check if your files open smoothly now.
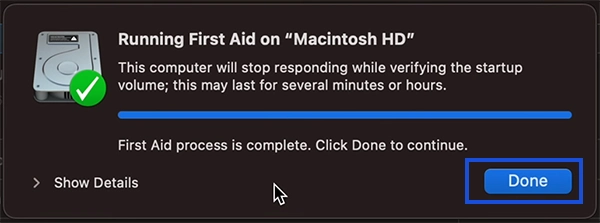
Note: If you are using a different Mac variant or an older version, the layout and button options may vary slightly.
Step 3: Safe Data Recovery
Whether your drive is fixed or not, you might really want your important data back. Safe data recovery is your ultimate backup plan when software fixes cannot open your files. Whether you want to recover data from Hitachi drive or Seagate drive, instead of risking permanent data loss on a failing drive, you can use specialised data recovery software to scan and copy your files onto a healthy computer. Also, if you previously saved your files to cloud backup, you can recover data from there.
Method 1: Cloud Backups
This is only for users who synced their folders to internet-based storage services like Google Drive, OneDrive, iCloud, or Dropbox before the drive failed. Because your files are safe on remote servers, you can easily restore your data back.
Advantages of Cloud Backups:
- Instant access anywhere
- Zero hardware risk
- Automated safety
Disadvantages of Cloud Backups:
- Internet dependent
Method 2: Professional Recovery Software
Here comes the last DIY data recovery method. This method is to be used when your files only exist on the failing hard drive. It is specialised software that can restore your files when any other method fails. Specialised software programs like Recua, EaseUS, Stellar, Disk Drill, etc. deeply scan through the hard drive storage sectors to put together data and copy it safely to another drive.
How does professional data recovery software work?
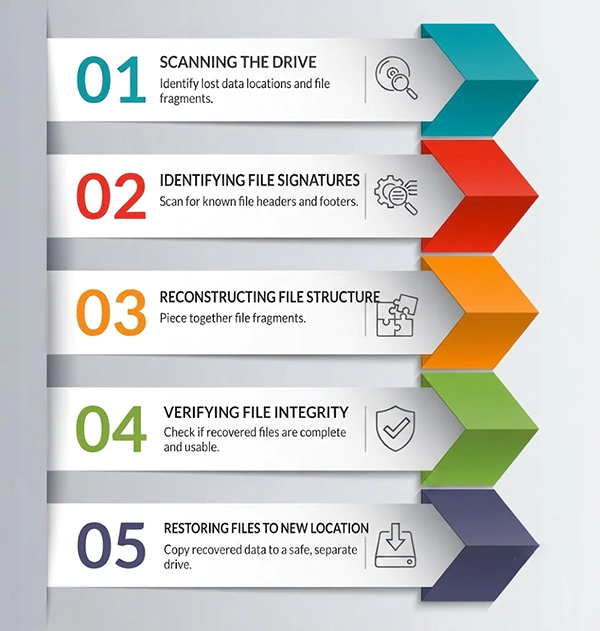
- Scanning the Drive: The software first crawls through the drive, reading all the raw sectors.
- Identifying File Signatures: Every file begins and ends with a unique code sequence called a file signature. The software identifies and tracks them.
- Reassembling the Data: The data is carved out and reassembled based on data continuity before displaying it on the screen.
- Preview: Most advanced data recovery software will have this feature. You are allowed to preview and choose the files you want to restore.
- Restoring the Files: Once approved, the software moves these reassembled files into a safe drive location selected by you. Now you can safely access these restored files.
Tip: Always extract your data before attempting repairs, as fixing structural or physical errors can permanently erase files.
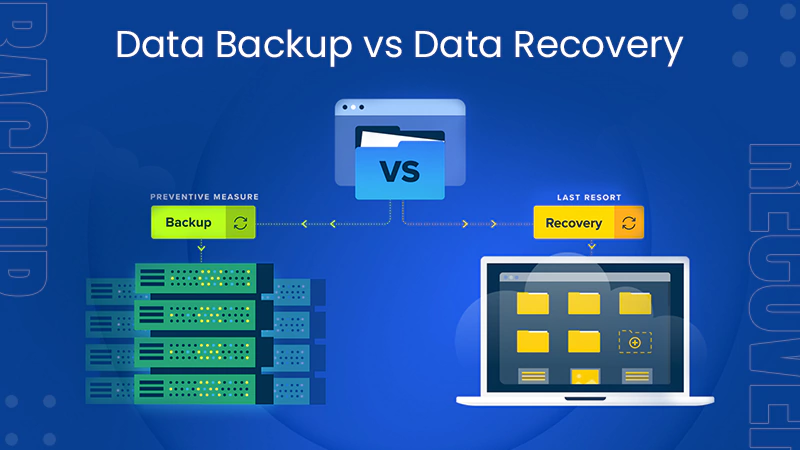
Having understood data backup vs data recovery, now you know how valuable cloud backups are. Next time, don’t forget to back up your drive data to cloud servers for emergencies.
Addressing Physical Hardware Damage
Hard drive having physical damage cannot be detected by the computer. This type of failure means the internal mechanical components of the hard drive have become physically broken or misaligned.
The physical damage to a hard drive is generally caused by:
- Physical drops
- Power surges
- Water exposure
- Natural component wear over time
Professional Data Recovery Services
In case of a physically damaged hard drive, you must skip all software fixes and send the device to a professional data recovery lab. These labs operate under strict cleanroom conditions to safely open the drive’s protective casing without dust destroying sensitive magnetic platters.
It is the only way to fix a physically broken drive and restore data safely.
Conclusion
The successful way for hard drive repair lies in diagnosing the problem. Always start by figuring out if your issue is a simple software glitch or a broken physical part. Once the main reason for the hard drive issue is known, apply the correct fix as per your device and situation. Run the software tools only if the drive is completely silent and physically healthy.
When DIY methods fail, or physical damage is present, use professional data recovery services, which range from $100 to $2,500+.
Frequently Asked Questions
Can hard drives be repaired?
How to repair hard drives?
Ans. The hard drive repair process follows three steps:
- Diagnose: Check if the drive has a software issue or a hardware issue.
- Apply Fix: Use built-in system repair software to fix logical issues.
- Recover: Use cloud backup or data recovery software to recover the drive data.
How to repair external hard drive on a Mac?
Ans. Mac computers have a built-in repair tool called First Aid.
- Open Disk Utility.
- Select your external hard drive from the sidebar.
- Click the First Aid button at the top.
- Click Run.
Can a physically damaged hard drive be repaired at home?
Ans. No. Physically damaged drives require dust-free environments called cleanrooms and specialised parts. Opening a hard drive at home exposes the drive’s internal parts to dust, which might scratch the internal components and destroy your files forever.
What is the difference between CHKDSK and data recovery software?
Ans. CHKDSK is a repair tool that modifies the drive to fix code errors and blocks off damaged areas, which can sometimes overwrite or erase your data. Data repair software does not change anything on the drive. It only reads raw data to copy your files safely to a different drive.
Sources:
Update drivers through Device Manager in Windows – Microsoft Support
How to repair a Mac storage device with Disk Utility – Apple Support
Data corruption and disk errors troubleshooting guidance – Microsoft Learn
fsutil repair – Microsoft Learn
TestDisk Step By Step – CGSecurity
Related Blogs
You Might Also Like
8 min read
How to Recover Files After Shift+Delete? Data Recovery Hacks We were browsing Reddit recently and noticed that the forums are packed with people asking queries like: “Need advice on…
Data Recovery
August 11, 2026
8 min read
How to Recover Data from Hitachi Drive? Data recovery from Hitachi drive (now often HGST/Western Digital) requires a cautious approach, especially if the drive makes unusual noises.…
Data Recovery
August 11, 2026
8 min read
How to Recover Deleted JPG/JPEG Files? You are here because you’ve likely deleted the important images. Whether you accidentally hit “delete” or your SD card got…
Data Recovery
August 11, 2026

8 min read
What is Data Recovery Agent (DRA)? Windows EFS & BitLocker Recovery Guide Data Recovery Agent (DRA) is a designated Windows user account authorized to decrypt data encrypted by other users or the…
Data Recovery
August 7, 2026
8 min read
What Is DIY Data Recovery and How Does It Work? Your file is accidentally deleted, or let’s assume there was some software issue and you cannot get your files back.…
Data Recovery
August 5, 2026
8 min read
Data Backup vs Data Recovery: What’s the Difference and Why Does It Matter? Assuming that your data is secure just because you clicked “backup” is not right. Many organizations learn too late that…
Guides
August 5, 2026